Wednesday, 8 August 2012

Vegetarian Grilled Corn, Roasted Red Pepper and 5 bean Chilli...on burgers!

Vegetarian Grilled Corn, Roasted Red Pepper and 5 bean Chilli...on burgers!

As food jokes go, this one is pretty lame, I have to admit...but since we did have some of this delicious vegetarian chilli on hand to serve a couple of our herbivorous friends and I was in the mood for a big juicy burger, as often we do here, we combined the two. 

One of the ways we serve up our vegetarian chilli is spooned into large tempura battered red onion rings. It really is delicious this way and can serve as an appetizer or as a vegetarian main course. On a burger, the large onion ring serves as a vessel to contain the spicy chilli on top. It may have been a collision of herbivores and carnivores at our table but it sure was delicious!
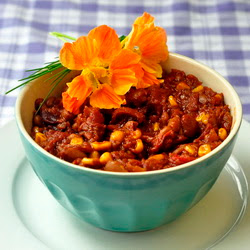
Vegetarian Grilled Corn, Roasted Red Pepper and 5 bean Chilli...on burgers!
Chilli

Soak 1 to 1 ½ cups dry 5 bean mix beans overnight, depending on the amount of beans you prefer in your chilli. You may use canned beans if you prefer.

In a large pot heat 3 tbsp olive oil.

Add
6 cloves minced garlic
2 medium red onions

Cook until the onions begin to soften.

Add

1 ½ cups tomato sauce
4 cups crushed tomatoes
2 roasted red peppers chopped
3 ears of grilled corn, removed from cob
1 minced jalapeƱo pepper( optional)
1 1/2 tsp ground cumin
4 heaping tbsp chili powder
3 tablespoons molasses
Salt and pepper to season
4 tbsp chopped cilatro
pre-soaked r canned  beans
Simmer very gently over low heat for 1 ½ to 2 hours stirring occasionally. Serve alone or with tortilla chips and garnishes of grated cheddar cheese, sour cream and lime guacamole.

Tempura Red Onion Rings

Heat canola oil in a deep fryer to 350 degrees F or shallow fry in an inch of oil in a deep cast iron frying pan using a thermometer to keep a careful eye on the heat level.

Mix together

1 egg + enough whole milk to make 1 cup

Whisk in

1 cup flour

Some lumps in this simple batter is just fine. Let batter stand for 10 minutes before dipping

1  inch rings of red onion

into the tempura batter and then dropping them into the deep fryer. Cook for only a few minutes until light golden brown.


Nutella {Chocolate Hazelnut} Cupcakes

Moms everywhere (that would be ME) are counting down until the first day of school.
It's almost here...
Wahoo!! 

Let's take a break from Back to School shopping and celebrate, shall we?

I think this calls for chocolate. And nutella! I give you...
Chocolate Hazelnut Cupcakes with Nutella Buttercream!


Here are the star ingredients in this recipe...


The coffee creamer adds a touch of hazelnut flavor to the chocolate cupcakes,
and makes them super moist and delicious.

The nutella makes the buttercream out of this world!
Seriously, you will be eating it right out of the bowl. With your fingers.

 Chocolate Hazelnut Cupcakes with Nutella Buttercream
by Bird On A Cake
Yield: 30 cupcakes
Ingredients
Chocolate Hazelnut Cupcakes
  • 1 cup boiling water
  • 1 1/2 cups sugar
  • 1 3/4 cups flour
  • 3/4 cup cocoa powder
  • 2 teaspoons baking soda
  • 1 teaspoon baking powder
  • 1 teaspoon salt
  • 2 eggs
  • 1 cup hazelnut coffee creamer
  • 1/2 cup oil
  • 1 teaspoon vanilla extract

Nutella Buttercream
  • 1 cup (2 sticks) unsalted butter
  • 1 cup Nutella (chocolate hazelnut spread)
  • 4 cups confectioners' sugar
  • 1/4 cup heavy cream

Instructions
Chocolate Hazelnut Cupcakes

Heat oven to 350 degrees. Prepare your muffin pans with paper liners. Bring some water to a boil and keep it simmering while you mix the other ingredients.

In a large mixing bowl, whisk together the sugar, flour, cocoa, baking soda, baking powder and salt. Add the eggs, hazelnut creamer, oil and vanilla. Beat with electric mixer until combined.

Add 1 cup of the boiling water and carefully stir until it is mixed in. Beat for 1 1/2 minutes with mixer. Pour batter into paper liners, filling each 2/3 full. Bake for 15-17 minutes (until toothpick inserted in center comes out clean). Allow cupcakes to cool on a rack.

Nutella Buttercream

In a large mixing bowl, combine butter and Nutella on low speed. Alternately add sugar and cream; mix until fluffy. If not desired consistency, add more cream one tablespoon at a time. Keep covered.
Powered by Recipage


Garnish each cupcake with a piece of chocolate hazelnut candy bar.
Enjoy!

I share my recipes & tutorials at these fun link parties.

This post was featured!
KitchenFunThe 36th AVENUE
Corner Houselaughterandgrace.com
I Was Featured On...Whipperberry

Monday, 6 August 2012

Double Chocolate Black Forest Cake

Double Chocolate Black Forest Cake
It's official, we now have 2 teenagers in the house! Number one son celebrated his 13th birthday this past weekend and got to choose his birthday cake. He chose chocolate and cherry and I immediately thought black forest cake but with such beautiful, ripe, sweet cherries on hand I wanted to use them in their natural state rather than making a cooked filling. Instead I layered them with whipped chocolate ganache frosting and plain layers of whipped cream in this utterly decadent cake. I think the cherries on top makes for a beautiful presentation too. Who wouldn't want this as a birthday cake?! 

The recipe here is all ages friendly but if you want to add some Kirsch or other cherry liqueur to the cake by sprinkling about an ounce or so of the liqueur on each of the cake as you construct it.

Chocolate Cake
  • 2 cups sugar
  • 2 cups all purpose flour
  • 3/4 cup cocoa
  • 2 tsp. baking powder
  • 1 tsp baking soda
  • 1/2 tsp salt
  • 2 eggs
  • 1 cup soured milk (just add a tablespoon of lemon juice or plain vinegar to a cup of milk)
  • 1 cup black coffee
  • 1/2 cup vegetable oil
  • 1 tsp vanilla extract

Combine all ingredients in a mixing bowl and beat with electric mixer for 2 minutes.
Pour into 2 greased and floured (or dusted with cocoa) 9 inch cake pans. Bake at 350 degrees F for 30-35 minutes or until toothpick inserted in the center comes out clean. Cool completely on a wire rack. When completely cooled, split the two layers into four with a sharp serrated bread knife.

Whipped Chocolate Ganache

To prepare the filling/frosting, melt together in a double boiler

  • 3 cups dark chocolate chips
  •  1/2 cup whipping cream

Stir constantly over a gentle simmer in the double boiler, just until melted and smooth throughout. You do not want this mixture to get hot, it should be just at the melting point and only lukewarm to the touch.

Transfer to a large mixing bowl.

In a separate bowl, whip to firm peaks:

  • 2 cups whipping cream

Add the whipped cream to the chocolate mixture in four portions, folding gently after each addition until the whipped cream is completely incorporated into the chocolate. 

At this point you will probably have to chill this frosting for a half hour or more in the fridge if it is too soft to work with. Just give it a quick fold with a rubber spatula every 10 minutes so that it cools evenly in the fridge.

Vanilla Whipped Cream

  • 2 cups whipping cream
  • 4 rounded tbsp icing sugar (powdered sugar)
  • 2 tsp vanilla extract

Whip together to firm peaks.
  • 1 pound ripe fresh cherries, pitted
  • chopped chocolate for garnish

To construct the cake, split the two layers of cake into four using a sharp serrated bread knife. Place the first layer of  cake onto the cake plate and cover with a little of the vanilla whipped cream followed by the next layer of cake. Spread a thin layer of the whipped chocolate ganache on this layer and place a layer of pitted cherries on top followed by more whipped ganache to completely cover the cherries.

Add the next layer of cake, more of the vanilla whipped cream and the final layer of cake. Frost the entire outside of the cake with the remaining whipped ganache frosting and place another layer of pitted cherries on top of the cake. Garnish with borders of vanilla whipped cream and with chopped chocolate on the sides.

Sunday, 5 August 2012

Adventures of Enaz


My dear friend Heather and her sweet 7 year old son Zane just announced the birth of a project that they've been working on for the last 6 months ... The Adventures of Enaz!

Zane was diagnosed early in his life with Cerebral Palsy and Pervasive Sensory Disorder along the Autism Spectrum.  Heather and Zane are raising money to go to AMMA's ashram in India for 3 months to offer a place of stillness for Zane's nervous system, to heal through yoga and meditation.  

I feel inspired to share their story with my loyal, supportive readers.

Please take a moment to watch (less than 5 minutes of your time) and read more about their campaign/quest.  


I have known Heather for 5 years.  She’s one of the most beautiful people I have ever met.  She has given her love, energy and attention to so many.  She is a doula, CMT body worker, midwifery student/apprentice, herbal/nutrition consultant and a FABULOUS mommy.  Heather is an inspiration for me, one of the best mother’s I have ever known and is a role model for me in my own parenting of my daughter.  I am honored to call her my friend and so grateful to know her.   

Heather is such a compassionate, loving, devoted mother and she deeply values Zane as a person.  Zane is truly a special boy, and I hope that his story will inspire you.

From Adventures of Enaz:
"I am passionate about seeing what the possibilities are in healing for Zane. For those of us with children with special needs or children in our lives in general, we know first hand what life can feel like when we are limited in how to support them in reaching their potential.  
I believe in looking at life through different lenses. That each person is unique in what their soul may be needing to find the balance that it seeks." 
~ Heather Diamond, Pioneer Mama 
Check out the Adventures of Enaz and read more about their story on Indiegogo.


Thank you so much for your time and deep gratitude for any support.  If you feel inspired by Heather and Zane’s story, please help support, donate if you can, and help spread the word.

Love and Light,
Emily

Why this is relevant here: Heather is another holistic mommy on a beautiful journey, one who truly understands the beauty of nourishing REAL food, herbs, homeopathics, and holistic health.  I have witnessed the way she cooks for and nourishes Zane, the beautiful food she prepares for him.  I have always been inspired by her knowledge of nutrition and herbs … she has made me some of the most special herbal tea blends, which I happily made into infusions. 


Saturday, 4 August 2012

Espresso Chocolate Chip Shortbread Cookies


 For over 150 more tried and tested cookie recipes be sure to browse our 
Espresso Chocolate Chip Shortbread Cookies
I am an absolute nut for a good buttery shortbread cookie. They are simple perfection. I have had chocolate chips in shortbread cookies before but was a little skeptical about adding the espresso flavour. The result though, was fantastic with the full flavour of the coffee, chocolate and buttery shortbread all fully present but well balanced in this wonderful, simple little treat.


Espresso Chocolate Chip Shortbread Cookies

Recipe by Barry C. Parsons
Espresso Chocolate Chip Shortbread Cookies - easy buttery shortbread cookies with the amazing flavor combination of coffee and chocolate. A perfect afternoon tea or coffee cookie and they freeze really well too.

Prep time: 1 hour 20 minutes, including 1 hour chilling time
Cook time: 25 minutes
Total time: Under 2 hours
Yield: Approximately 18 cookies, (variable according to the size you choose to make them.)
Ingredients
  • 1 1/2 tbsp instant espresso powder
  • 1 tbsp hot water
  • 1 cup butter (real butter, no substitutes)
  • 2/3 cup icing sugar (powdered sugar, confectioners sugar)
  • 1 teaspoon pure vanilla extract
  • 2 cups plain flour
  • 3/4 cup dark chocolate chips
Directions
  1. Dissolve the espresso powder in the hot water and set aside to cool. Meanwhile in the bowl of an electric mixer cream the butter and icing sugar very well until light and fluffy.
  2. Add the dissolved espresso powder and the vanilla extract and blend in well. Finally add the flour and work into the butter mixture until almost incorporated.
  3. Add the chocolate chips and stir in by hand with a wooden spoon so as not to break up the chocolate chips in the mixer.
  4. Press the dough together into a ball (or better shape into a flat square). Wrap with plastic wrap and refrigerate for an hour or two. Roll out into a square about 1/4 inch thick. Place on a parchment paper lined cookie sheet and trim the edges.
  5. Cut the cookies into your desired shape, squares, rectangles, triangles but keep the sheet of dough all together on the cookie sheet, you will break the cookies apart later.
  6. Bake at 325 degrees F for 20-25 minutes or until the edges are lightly browned. These will not get very dark as they bake. Cool on the pan for 15 minutes and then on a wire rack.

Thursday, 2 August 2012

Summer Peach Custard Tart


Summer Peach Custard Tart

This beautiful summer tart is so simple and so utterly delicious, folks will think that you slaved over a hot oven to make it. The truth is it takes only a few minutes to prepare for the oven. With fresh Ontario peaches in the stores at the moment, I couldn't resist using my favorite summer fruit in this incredible tart. We served it at dinner last week and then everyone in the house fought over the leftovers. I practically never have seconds of dessert but went looking for thirds of this perfect summer fruit dessert. 

Summer Peach Custard Tart

Crust

1 3/4 cups graham crumbs 
1/3 cup melted butter
3 tbsp sugar

Mix together well and press into the bottom and sides of an 11 inch fluted tart pan with a removable bottom. Bake for 7 minutes at 350 degrees F.

Whisk together until the sugar is dissolved:

1 cup full fat sour cream
1/3 cup sugar
2 tsp vanilla extract
1 large egg

Pour this into the baked shell. Thickly slice into wedges:

4 to 5 ripe peaches, depending on size.

You want to slice the peaches thick so that they stick out of the cream filling. Add only enough of the slices to bring the custard to the top of the pan.

Bake for 25-30 minutes at 325 degrees F, until the center is set and jiggly. Cool completely in the fridge before cutting and serving.

Wednesday, 1 August 2012

Orange & Pink Polka Dot Cake

Today I am sharing a super simple way to make a polka dot cake.

 
What is my secret to perfectly round dots that are all the same size?
Candy melts!
 

The directions are very simple.
After frosting your cake, press the candy melts into the frosting with the flat side up.
You can arrange them in a pattern or place them randomly.

You can create lots of variations on this idea, just by using different color combinations ...

White candy melts on blue or pink frosting for a baby shower!
Brown candy melts on orange frosting for Halloween!
A rainbow of colors on white frosting!

I'm sure you can think of more great possibilities.


I chose an orange and pink combination just because I think they are pretty together.
Then I used my Orange Creamsicle Cupcakes recipe for the cake.

Have you tried it yet?
It is one of my absolute favorite recipes...YUM!!


Enjoy!

I share my recipes & tutorials at these fun link parties.

This post was featured!
They are talking about me at CraftGossip.com