Wednesday, 19 January 2011

Coming Soon: Panda Wings?

I'm about to air a video for, "Panda Wings." As the name suggests, this will be another fabulous addition to our award-winning collection of chicken wing recipe videos. The "panda" part comes from the fact that the spicy orange glaze you see glistening here, is inspired by the most popular entree at the popular Chinese fast food chain, Panda Express. 

So, can I use this name? Will I get letters from their lawyers? Are you a trademark attorney, or at least play one on the Internet? I'd love to hear what you think!

Tuesday, 18 January 2011

Instant Mashed Potato Pancakes – Made from the Other Kind of Leftovers

I loved seeing mashed potatoes at the dinner table growing up, not only because I loved mashed potatoes, but also because it meant my mother would be using the leftovers to make fried mashed potato pancakes.

These were nothing more than cold mashed potatoes, shaped into patties, and browned in butter. I loved them, and use that same trick to this day. The potato pancakes you see here were born from ano
ther kind of leftover potatoes…the end of a box of instant potato buds.

I'd used them while testing the crispy onion rings recipe, but didn't want to keep such an unsightly container in my pantry (you never know when some other celebrity food blogger is going to drop in to borrow a cup of foie gras), I decided to see what would happen if I
used it, uncooked, in a potato pancake mixture. What happened were four crispy, buttery, perfectly decent potato pancakes!

One advantage this version has over the freshly mashed one is those contain milk and butter, which makes it much harder to hold together when fried. I'm not saying you should just switch to instant, but I felt like I had to find some shred of a culinary advantage.

Logistically, this would be perfect for backcountry camping, or your friendly neighborhood college dormitory for obvious reasons, not the least of which is its cheapness and shelf stability (and by "shelf," I mean an old milk crate, turned on its side).

So, if you have some instant potatoes in the pantry, maybe consider giving this a try. Otherwise, remember this the next time you do find yourself in a similar situation. I mean, who would go out and buy a box just to specifically make a batch of these crispy, crusty, delicious patties? Enjoy!


Ingredients:
1 cup cold water
1/2 teaspoon salt
1 egg, beaten
3/4 cup Betty Crocker Potato Buds (probably will work with any similar brand)
fresh chives
freshly ground black pepper
cayenne to taste
1 tablespoon vegetable oil
1 tablespoon butter

Monday, 17 January 2011

Chick-O-Sticks!!!...don't ever leave me again!!! You had me worried sick!!


My FAVORITE Childhood Candy


Reunited & It Feels So Good!!

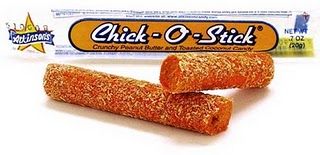
I found it yall!!!!!! OMG I feel like Charlie with the Golden Ticket right now!!! I've got it right here in my hands! I can feel the power!!!!


If you follow me on twitter and facebook then you know I've been on a search for the past few months to find my favorite childhood candy, the oh-so-tasty, Chick-o-Stick!!!

{Fond photos of me posing with a Chick-o-Stick coming soon!!!}

I still remember the first day I laid eyes on this lovely candy stick. My mother bought it for me as a treat for doing good in school. We were not allowed to eat much candy growing up so when we did get candy it was like, a big deal!

I kept taking tiny bites, wrapping it up, and sticking it up under my mattress (uh...yeah. It lasted for months. yeah I know.) because I wanted to saver it and didn't want any of my siblings to find it. LOL

Ahhhh that sweet, crunchy, crispy,  chewy, orange, peanut-ty flavored log, rolled in fine coconut. Some people call it a chocolateless butterfinger. I call it the stuff my childhood is made of!!


Anyway, like I said, I FINALY FOUND THEM!!!!! Thanks to my fabulous candy-loving readers who hipped me to their location...DOLLAR GENERAL and to my wonderful cousin Quanna who pin pointed the exact Dollar General location in my area!!!!!

I saw them as soon as I opened the door and yes a big smile came on upon my face!!

There they were, arrange so neatly in a case. It was packed in that store and I'm sure those  people in line were probably thinking "wow, really? Is it that serious?" to see me smiling that hard while heading straight to Chick-o-Sticks, slowly saying "Chick-o-sticks" while admiring them.

I decided to get just one. Of course the foodie in me wanted to get a handful so that I could stash some in case Dollar General decided to play a cruel joke, but I resisted.

I just have this one chick-o-stick. And as I type this blog post, I'm taking teeny tiny bites and appreciating every moment!


Did you know:


Chick-O-Sticks has been manufactured since The Great Depression.


A sugar-free version of chick-o-sticks are also available

Chick-O-Stick's original wrapper featured a chicken wearing a cowboy hat and a badge in the shape of the Atkinson logo. 


The chicken was done away with when people were often confused over whether the Chick-O-Stick was candy or a chicken-flavored cracker. The Atkinson Candy Company says that the chick-o-stick resembles fried chicken and that's really how it got it's name. (uggghhh...what kinda fried chicken are they eating???)


P.S. If you ever want to make me happy, just send me a Chick-o-Stick.  Not now though, I'm on a "lose my gut in 4 weeks" diet. Wait until the fall-winter holiday season when I proudly welcome the muffin-top look.

Next time you're at the store buy a chick-o-stick, just one!
I swear it's fun to take tiny bites.

Thursday, 13 January 2011

Citrus Mint Water

Citrus Mint Water

Citrus Mint Water

I can't tell you how many times I've googled "flavored water recipes".  I'm always trying to find ways to make drinking water taste better. I just don't like drinking the stuff, period! Well...I can kinda tolerate it if it's super duper cold.

There is no denying that water makes me look and feel INCREDIBLE!

When I'm thoroughly hydrated I can pretty much skip foundation. My skin glows and looks so youthful, my complexion is even, I'm full of energy, happier and it keeps that impulse snacking at bay like a champ.

Like so many of us, this year I have made a promise to my body to drink 64 oz. of water a day.  I make this resolution ALL the time and usually start falling short within a week and dreading each gulp. But not this year!!!

So far I have been successful and I must say, it's pretty darn easy!

I use to drink those lil sparkly waters but they are just loaded with too much other "stuff" and the healthier ones are way to expensive for my 64 oz a day regimen.


Here's the current flavor combination that I'm loving as of now. CITRUS MINT!!   It's easy, cheap and healthy.  Don't worry the mint will not make the water taste like mouthwash. If you prefer a minty taste then you can blend up the mint.

How to make Citrus Mint Water

There are tons of different plants, fruits and natural extracts you can add to your bottle water to make it more pleasurable to drink.  Below are a few add-ins I've tried and found to be tasty.

Yummy Water Add-ins
1-2 drops of organic vanilla extra + a handful of mint leaves
orange slices+ blackberries
cucumbers + lemon or cucumbers+strawberries
spearmint & peppermint leaves


The above recipe and the add-ins WILL NOT totally transform the taste of water. It just adds an essence to it. It's a healthy option for those who want to keep their water as healthy as possible without adding in artificial sweeteners and other stuff.


Tip:
When adding in citrus, don't let it sit in your water overnight or the water will start to taste like the peel. I usually add mine in the morning when I make up my bottles and then stick them on the freezer to chill.

Citrus Water Not Your Thing? How About This Refreshing Cucumber Lemon Spa Water!

Monday, 10 January 2011

Stuffed Meatballs: Italian Cheese & Herb


Stuffed Meatballs: Italian & Herb

Stuffed Italian Cheese & Herb Meatballs

Imagine my surprise when I was selected to try out Krafts new Philadelphia Cooking Creme (what a creative idea!) before it hits the shelves nationwide! Free food? Seriously?  How could I decline!

I received a huge refrigerated case and was told to try them out and create video how-to's for each flavor. Let me just say, ALL of the cremes are soooo good and I'm not just saying that because I got them free lol. I'm positive you all will love them too because the flavor pay off is incredible!!

Here is my how-to video using the Italian Cheese & Herb flavor.  I created these addictive Stuffed Italian Cheese & Herb Meatballs!!


These stuffed meatballs are seasoned enough to be eaten as appetizers or served along with rice or potatoes. Yet, they are mild enough to compliment your favorite sauce.

I hope that you enjoy these quick & easy Stuffed Italian Cheese & Herb Meatballs just as much as my family did!


Watch me make these Stuffed Italian Cheese & Herb Meatballs from start to finish!!


INGREDIENTS

  • 1 green bell pepper, finely diced
  • 1 sweet red pepper, finely diced
  • 1 small sweet onion, finely diced
  • 1/4 cup(s) of black olives, chopped
  • 1 cup(s) of mild cheddar cheese, shredded
  • 1/2 cup(s) of turkey pepperoni, chopped
  • 2 cup(s) of Italian Croutons, crushed
  • 10 ounce(s) of Italian Cheese & Herb Cooking Creme
  • 1 pound(s) of ground turkey
Steps
  1. Saute peppers and onions until tender.
  2. Place the peppers and onions into a large bowl.
  3. Add in the black olives, cheddar cheese, turkey pepperoni, Italian croutons, and cooking creme.
  4. Stir until combined.
  5. Add in ground turkey and stir just until incorporated.
  6. Prepare baking pans by lining them with nonstick foil. Oil the foil lightly if desired.
  7. Roll out the meatballs to about 1.5 inches wide.
  8. Place 2 inches apart on the baking sheet.
  9. Bake in a preheated, 400 degree oven for 12-15 minutes or until browned.
  10. Be careful not to over bake.
  11. Let the meatballs cool slightly before removing them from the pan.

Wednesday, 5 January 2011

Soulful Vegetarian Chili


Soulful Vegetarian Chili


Vegetarian chili that is full of soulful flavor and hearty enough to stick to your bones??? Say it aint so!!!!

I'll admit vegetarian chili didn't sound that appealing to me at first. I guess I'm just not a real veggie lover (although I'm trying to be) I'm a meat & potatoes,  (cakes, cookies, ice cream, pies, candy,) kinda girl and it just seemed like a cruel thing to do to chili...you know, adding all those vegetables and stuff.

My oldest sister, who is a vegetarian, has been telling me how fabulous her vegetarian chili recipe is for the longest. Even though she is one of those "healthy people" I trust her when she tells me something vegetarian tastes good. She was raised on my mothers and grandmothers soulful cooking and knows how to doctor up those vegetarian dishes like a seasoned pro.

Since so many of us are trying to watch our weight this time of year, I figured you would appreciate a hearty, savory, yet healthy dish to add to your recipe collection. (you can thank for my sister Nikki, although I did tweak this recipe a bit from the original)

This vegetarian chili recipe does not disappoint! It's hearty, mild enough for my toddler, yet my spicy, meat- chili-loving husband gave it 5 stars!  I found myself eating my second bowl without even noticing it.

It's loaded with fresh vegetables like zucchini, peppers and corn, three kinds of beans, and a perfect blend of savory spices! This vegetarian chili can easily be customized with your favorite veggies or kick up the heat to your liking.

Serve it up with a hunky square of buttermilk cornbread and a crunchy green salad..magnificent...and healthy to boot!!

Watch me make this vegetarian chili  recipe from start to finish


(this stuff is AWESOME when eaten the same day, but it's AMAZING when eaten the second day when all of the spices have had a chance to soak up in the beans and vegetables.)

INGREDIENTS

1 zucchini, chopped
1 green bell pepper, chopped
1 sweet red pepper, chopped
1 small onion, chopped
2 cloves of garlic, minced
1 jalepeno, seeded and diced (optional but so yummy)
3 Tablespoons of oil (for sautéing)
1 cup frozen sweet corn
1 (12 oz) bag Morning Star Meal Starters (grillers veggie crumbles)

1 (14.5 oz) can diced tomatoes
1 (14.5 oz) can whole Italian Stewed Tomatoes, chopped
1 (15 oz) can Tomato sauce

1 (15 oz) can kidney beans, rinsed & drained
1 (15 oz) can black beans, rinsed & drained
1 (15 oz) can garbanzo beans, rinsed and drained

3 T. chili powder
3 T celery flakes (or fresh celery)
1 1/2 t. seasoning salt
1 1/2 t. ground cumin
1 t. paprika
1 T. oregano
1 T. cilantro
2 t. sugar
1 T. parsley
2 t. thyme
1 T. basil (optional)


A few dashes of black pepper (optional)
A few dashes of liquid smoke (optional)


Taste and add more seasonings if desired!

 Just don't go too crazy with the seasonings if you plan on having leftovers because the flavors will really intensify overnight.

Tuesday, 4 January 2011

Pearl Barley with Mushrooms Recipe


I'm always on the look-out for new side dishes utilizing different grains. I tried making a quinoa dish and discovered I don't like quinoa. So the next step was to try making a pearl barley dish. I love pearl barley in soups, so figured that using chicken broth to cook the barley, and adding mushrooms to it, would be a good way to make it. This recipe is very simple, flavorful, and hearty, and my family loves it, but can only eat it every once in a while since Sam is slightly sensitive to barley.

Pearl Barley with Mushrooms Recipe

1 cup pearl barley
3 cups chicken broth

1 package of whole mushrooms (8 oz.)
Olive oil
Salt and pepper

Put 1 cup of pearl barley in a 2 cup measuring cup, fill the measuring cup with water and stir the barley around with a spoon to wash them before cooking them. Remove any debris or anything that floats to the top. Drain out the water and put the barley in a Medium cooking pot. Add 3 cups of chicken broth and start the pot to boil over High heat. When it boils, cover the pot and turn the heat down to Low. Let it simmer for 45 minutes, covered.

During the last 20 minutes of the barley cooking, wash, dry and slice the mushrooms.

Heat a large skillet, sprayed with non-stick cooking spray, to High heat. Add the sliced mushrooms, drizzle a little olive oil over them, salt and pepper to taste, and cook them until the mushrooms are browned.

When the barley is done, add the cooked mushrooms to the pot, along with a sprinkling of pepper and stir until well combined. Serves 4 people as a side dish.