Showing posts with label Breakfast. Show all posts

Tuesday, 28 June 2016

Chocolate Energy Bars – Looking Good…Maybe Too Good

If you compare these chocolate energy bars to similar fruit/nut bars sold at the store, I think they taste better, are nutritionally superior, and probably cheaper to make at home. The only problem is they look so good.

These look like fudge brownies, and so it does take a millisecond for the brain to process that they’re not going to taste like fudge brownies. Having said that, they really are delicious, and satisfying in a non-decadent, but still chocolaty way.

Try your hardest to find Medjool dates, but if you can’t, any dried date should work, as long as it’s soft and sticky enough. If the ones you’re using seem too hard and dry, simply soak them in water until they soften up a bit.

Beyond the advantages I’ve described already, you also have the freedom to use any combination of nuts, seeds, and dried fruits you’d like. There’s about a million ways you can go, and I expect to hear about any particularly brilliant combinations. I hope you give these a try soon. Enjoy!


Makes about 12 Chocolate Energy Bars:
2 cups chopped, pitted Medjool dates
2 cups raw cashews
1 cup raw or roasted unsalted almonds
3/4 cup high-quality unsweetened cocoa powder (I used Guittard Cocoa Rouge)
2 tablespoons coconut oil
1/2 cup unsweetened shredded coconut
2 teaspoons vanilla extract
1 to 2 tablespoon cold espresso coffee or water,
1/2 teaspoon kosher salt (or 1/4 teaspoon fine salt)
very small pinch cayenne

Friday, 10 June 2016

Bacon & Asparagus Dutch Baby, Baby!

I’ve been seeing savory, non-breakfast versions of Dutch Babies pop up on menus lately, and while I’m not sure that means it’s a hot new trend, I figured I would get in on the ground floor with this amazing bacon and asparagus version, just in case.

Above and beyond the ingredients, the most important thing here is using a cast iron pan similar to, or better yet, exactly like, the 12-inch example seen herein. These relatively cheap and indestructible pans are one of the best kitchen investments of all time, but if you don’t have one, there is a Plan B.

You’ll have to do the bacon and asparagus steps in a frying pan, and then transfer everything to a similarly sized casserole dish. Make sure the sides are coated with your bacon fat, and then pour in your batter, and bake as shown.

It will take a few extra minutes in the oven, but just simply bake it until it’s browned, and properly puffed. It won’t work as well, but you should get similar results. Either way, I really hope you give this wonderful bacon and asparagus Dutch Baby a try soon. Enjoy!


Ingredients for 2 large or 4 small portions:
3 large eggs
2/3 cup milk
3/4 teaspoon kosher salt
1/2 cup finely grated Parmigiano-Reggiano (1/4 cup if packed, but don’t pack it)
freshly ground black pepper and cayenne to taste
1 tsp lemon zest
1/2 cup all-purpose flour *packed 
*push and pack as much flour as you can fit into the 1/2 cup measure)
1 tbsp olive oil
6 strips bacon
1 generous cup sliced fresh asparagus

- Bake at 475 F for about 12-13 minutes, or until browned and puffed

Friday, 29 April 2016

Easy One-Bowl, One-Step Hollandaise - A Miracle of Modern Science

I'm not sure what specifically that would be, but I assume there’s some kind of science behind this amazing, and possibly modern method I happened to stumble upon. I once saw a chef make hollandaise buy adding chucks of cold butter instead of whisking in hot melted butter, and it intrigued me.

Not enough to actually try it, but enough to make me wonder what would happen if we dumped everything in the bowl at once, and just cooked it all together. No one was more shocked than I was when it worked. And worked beautifully. By the way, I’m guessing I’m not the only person to have thought of this, but until I see proof, I will claim to be it’s inventor.

The only way this doesn’t work is if your heat is too high. I don’t have to tell you what will happen if it is. However, over a low flame (or double-boiler if you’re scared) this will come together very gradually, right before your eyes, and you’ll be able to stop anytime you see fit.  

Eggs are cheap, so give it a try, and see what happens. Being able to just dump everything into the bowl, and make hollandaise in one step is well worth the investment, especially with Mother’s Day coming up. Hint, hint. I really do hope you give this a try soon. Enjoy!


Ingredients for 2 portions (this can be scaled-up to how ever much you need):
1 large egg yolk
4 tablespoons cold unsalted butter, cubed
2 tablespoons cold water
1 tablespoon fresh lemon juice (you can always add more to taste)
salt and cayenne or hot sauce to taste
NOTE: If sauce gets too thick, just thin with a little hot water.

Friday, 22 April 2016

Kumquat Marmalade – Beautiful, Delicious, and Almost Easy to Make

If you’re like me, and marmalade is not your favorite type of fruit preserve, it’s most likely because of those bitter flavors from the white parts of whatever type of citrus was used. That is not an issue with this gorgeous kumquat marmalade.

The secret here is using a type of citrus that doesn’t really have any of those pithy parts, which is why kumquats are the only citrus I know of that you eat whole, skin and all. If you are going to enjoy au naturel, make sure you roll them first, to release all that sweet, fragrant oil.

However, if you’re going to cut them up as seem herein, then rolling each one is not necessary, as the oils will be release as we quarter, seed, and slice. This is a good thing, as we need all the time-savings we can get, since what we are going to do, is painstakingly remove the center white membrane.

I believe this will make your marmalade even less bitter, but mostly it’s for appearance. For me, those little white bits spoil the perfect, clear-orange jelly that’s produced. But if you think I’m crazy, and you want to save a half-hour, you can probably skip that step, as long as you get all the seeds. I really hope you give this a try soon. Enjoy!


Ingredients for about 2 cups:
2 generous cups sliced kumquats (measure after they have been quartered, seeded, and sliced into small pieces)
zest and juice of 1 lemon
small pinch cayenne
1 cup white sugar
1 cup cold water
1 star anise (I remove after 10 minutes of simmering)
- Note: You can just go by appearance, but I took the temperature right before it was done, and it was bout 215 F., so I imagine when I was finished it was around 220 F. You can also put a spoonful on a plate in the fridge, and test that way.

Monday, 4 April 2016

Pecan Sour Cream Coffee Cake – Now with More Crumbs

I’m sure I’ve said it here before, but I’m not a big cake guy. I’ll take a few bites at a wedding for appearances, and of course on a birthday, since that’s what you do, but besides that, cake is none of my business. However, one big exception would be the crumby goodness that is pecan sour cream coffee cake. 

As I mention in the video, the best part of a coffee cake is the crispy, crunchy, buttery crumbs; so we significantly upped the amounts used. I’m not sure why everyone doesn’t do this…maybe their health? Regardless, it creates what I think is the “ultimate” coffee cake experience.

One tip for placing on the second layer of batter: You can use a piping bag to squeeze an even layer, and then touch it up with a spatula. Having said that, as you saw in the clip, even if you spread by hand, and mix in a few nuts, it still comes out beautifully.

This recipe is really foolproof, but mind your baking time. I used an 8” x 12” cast iron casserole dish, and it took about 35 minutes, but times will vary for glass dishes, as well as for slightly larger dishes, like the classic 9” x 13.” I’d start checking around 30 minutes, and go from there. I really hope you give this extra crumby coffee cake a try soon. Enjoy!


Ingredients for 8 to 12 portions:

For the crumb:
1/3 cup white sugar
1 teaspoon cinnamon
1/3 cup packed light brown sugar
1 1/2 cup pecans, finely chopped
3 tablespoons melted butter
1/8 teaspoon salt

For the cake:
1/2 cup room temperature butter
1 cup white sugar
2 large eggs
1 1/2 teaspoons vanilla
1 cup sour cream or crème fraiche
1 7/8 cups all-purpose flour (Almost 2 cups. Do not pack cups. Spoon in gently.)
1/2 teaspoon fine salt
3/4 teaspoon baking soda
1 teaspoon baking powder

- Bake at 350 for 30-35 minutes, or until a skewer comes out clean.

Tuesday, 23 February 2016

Colcannon Hash – I Invented This, As Did Others Before Me

Every year about this time, I try to do some kind of culinary nod to St. Patrick’s Day, and this colcannon hash is the latest example. I really loved how this came out, and it made a beautiful, and delicious base for poached eggs, but there was one problem. Apparently, I didn’t invent this.

I thought I did, as I do with almost all the new recipes I create, but I figured I’d do a search anyway, just to confirm this assumption of singular brilliance. So I did, and it quickly became apparent that many others had the very same idea. Good for them.

I realize St. Patrick’s Day brunch isn’t really a thing, but if it were, this would be perfect. Although, we might have some leftover corned beef the day after, which would make this even more amazing; so maybe we should forget St. Paddy’s Day breakfast, and turn this into a hearty, day-after hangover cure instead. Either way, I really do hope you give this a try soon. Enjoy!


Ingredients for 2 large portions:
1 tablespoon vegetable oil
2 ounces pancetta or bacon, diced
2 large russet potatoes, diced, rinsed, and well-drained
1 tsp salt, plus more to taste
freshly ground black pepper to taste
2 tablespoons unsalted butter
1 1/2 cup sliced green onions (mostly the white and lighter green parts)
2 large handfuls baby kale, roughly chopped
1/4 cup freshly grated sharp Irish cheddar cheese (or any sharp cheddar)
pinch of cayenne
2 tablespoons freshly chopped Italian parsley 
2 or 4 poached eggs, optional (actually, not optional)

Friday, 13 November 2015

Bacon Cheddar and Spinach Strata – We’re Rocking the Breakfast Casserole

For such a simple dish, I sure have a lot of additional info to cover regarding the construction of this beautiful bacon, cheddar, and spinach strata. First of which, is the somewhat unusual name. Whoever invented this recipe apparently thought it looked like layers of rock, known in geological circles as, “strata.”

I guess it sort of does, and probably would a lot more, if we used a deeper dish, and did more layers. Regardless, even with just one layer of filling in the middle, you’ll still be looking at a gorgeous casserole, which should thoroughly impress your brunch guests…bottomless Mimosas or no.

As I mentioned in the video, if you want something a little eggier, a little more quiche-like, just simply increase the amount of egg custard used. As long as your pan is deep enough, you could as much as double the eggs and cream in this.

Speaking of the cream, this is a very rich dish, so you may want to cut the cream with milk. In fact, many people use all milk for this, but I do enjoy the extra butterfat the cream provides. As usual, let your conscience be your guide.

Above and beyond that, this recipe just begs for personalization. I’m not sure what your favorite omelet ingredients are, but I do know they would work in this, and work really well. I hope you give this a try soon. Enjoy!


Ingredients for 12 portions:
1 pound loaf of day old bread, cubed
12 large eggs
2 1/2 cups heavy cream, milk, or any combination thereof
2 teaspoons kosher salt
1/2 teaspoon freshly ground black pepper
pinch cayenne
pinch nutmeg
1 pound bacon, sliced and cooked crisp
1 pound fresh spinach, wilted, and squeezed dry (or enough thawed, drained frozen spinach to cover one layer)
12 ounces extra-sharp cheddar cheese, divided (use 1/2 over the first layer of bread, 1/4 over the spinach, and the last 1/4 over the top layer of bread)
- Bake at 350 F. for 45 minutes or until set. Then broil for a minute or two to brown the top.

Monday, 9 November 2015

Sweet Potato Muffins – The Sweet Potato Pie of Muffins

Sometimes you don’t have a good reason for not loving a certain recipe, and that’s how it is for me with sweet potato pie. It just does not do it for me, and I don’t even know what “it” is. However, I thought the same flavors could work for a holiday-inspired sweet potato muffin, and I was thrilled with the results.

These are perfect if you have leftover sweet potatoes during the holidays, but if not, totally worth cooking a few just for this easy recipe. I microwaved mine for about 6 or 7 minutes, until they were very soft, but roasting, or boiling will also work.

By the way, we’re not using sweet potatoes for our sweet potato muffin; we’re using yams, which are actually just incorrectly named orange-fleshed sweet potatoes.  So, I guess never mind.

As I mention in the video, these muffins are just a little bit of frosting away from being cupcakes. I’ve never understood the allure of mini marshmallows on a sweet potato casserole, but something tells me some “fluff” would work well on these, as well. I really hope you give them a try soon. Enjoy!


Ingredients for 24 Sweet Potato Muffins:
2 cups all-purpose flour
1 teaspoon kosher salt
2 teaspoons baking powder
1 teaspoon baking soda
2 teaspoons cinnamon
1/2 teaspoon ground ginger

pinch of freshly grated nutmeg
4 large eggs
1 1/2 cups sugar
1/2 cup light brown sugar
1 cup vegetable oil
1/4 cup melted butter
2 cups mashed sweet potato or “yams”
1 cup chopped pecans, plus more for the top
demerara sugar for the tops

- Bake for 25 minutes at 350 F. or until a wooden skewer comes out clean.

Thursday, 29 October 2015

A Waldorf Salad by Any Other Name

As I joked about in the video, a fruit salad has to be pretty damn good to actually get a name, and the venerable Waldorf salad is certainly worthy. 

I realize that there are a small group of you who won’t be able to wrap your heads around mayonnaise with fruit, and that’s a shame, since it means you won’t get to enjoy one of the great combinations of all time. By the way, if you are one of the aforementioned people, but like mayo slathered all over your sandwich, containing slices of sweet, ripe tomato, and caramelized onions, then you have some explaining to do. Also, coleslaw. I rest my case.

Embellish this as you see fit, but I really like it best with just the four ingredients seen here. Things like dried cranberries can add a nice seasonal touch, but for me, the chewy fruit gets in the way of that addictive crunchy/crisp texture. I really hope you give this old-school, but timeless Waldorf salad a try soon. Enjoy!


Ingredients for about 1 cup dressing (enough for 2 Waldorf salads below):
3/4 cup mayonnaise
1/4 cup crème fraiche or sour cream (I used CF)
juice from 1/2 lemon
1/2 teaspoon sugar
1/4 teaspoon salt
pinch freshly ground black pepper
pinch cayenne
1 tablespoon finely chopped tarragon

For 2 large or 4 appetizer sized Waldorf salads:
2 large crisp, sweet apples, cut in 1/2 inch cubes
1 cup small cubed celery root
1 cup quartered seedless grapes
1/2 cup toasted walnuts pieces

Friday, 23 October 2015

Shakshuka – Say It With Me Now

This Shakshuka, or Shakshouka if you prefer, is why I’m so glad the show/blog/channel is called, “Food Wishes.” This North African one-dish-meal is so fast, easy, and delicious, but it probably wouldn’t have occurred to me to do a video for it, unless someone sent me a request. 

I always appreciate these types of reminders, and seeing "Shakshuka" in a subject line does catch your attention, but now I have a little problem. I can’t stop saying it. It has basically replaced using profanity for me. Yes, now when I stub my toe, I yell "shakshuka!"

I know we did an Italian-inspired version of this idea, served in individual ramekins, but this is supposedly the original. The sauce is quite different, and I think more interesting. The peppers and mushrooms add another layer of flavor, and the spicing is much more complex. Not to mention, a large pan of this is much more of a showstopper.

Just be sure to cook your sauce until the veggies are nice and soft and sweet. I don’t think you want crunchy onions and peppers in this, so take a little time building the base. You will also have to monitor the liquid level as it simmers, but that’s very easy to adjust by adding a splash of water or broth.

Once the eggs go in, you can finish covered on the stove, or just pop the pan into a hot oven until they cook to your liking. I go for just barely set, and the advantage of that system is, if you do want them cooked more, you just need to stir the egg into that hot sauce, and it will firm-up instantly.

No matter how you like your yolks cooked, this makes for an impressive breakfast, brunch, lunch or dinner. And if you’re serving a large group, you can scale this up to any size pan or baking dish. I really hope you “shakshuka!” very soon. Enjoy!


Ingredients for 6 small portions:
(one egg per portion as appetizer - double for a main course)
2 tbsp olive oil
1 large onion, diced
large handful of sliced mushrooms
1 teaspoon salt, plus more to taste
1 cup diced red bell peppers
1 jalapeno pepper, seeded and sliced
1 teaspoon cumin
1/2 teaspoon paprika
1/2 teaspoon turmeric
1/2 teaspoon freshly ground black pepper
1/4 teaspoon cayenne
28-oz can (about 3 cups) crushed San Marzano tomatoes, or other high-quality plum tomatoes. Of course you can use fresh tomatoes in season.
1/2 cup water or broth, or as needed
6 large eggs (or as many as you can fit in you pan)
crumbled feta cheese and fresh parsley to finish

Thursday, 25 June 2015

Toaster Pastry Recipe


These homemade toaster pastries (we call them "Toaster Pops" at home) are made with minimal wholesome ingredients, so you don't feel bad when your child wants one.  I've found that jam works better than jelly for the filling (it's less runny when heated).  These toaster pastries are flaky and delicious and are a good complement to any breakfast or afternoon snack.

Toaster Pastry Recipe

1/2 recipe of Flaky Pie Crust (I use 1 cup of just unbleached flour for it, not both types of flour)
Your favorite jam
Sugar in the Raw

Preheat oven to 400 degrees.  Make the pie crust recipe.  Lay a piece of wax paper on your work surface, put a chunk of the dough in the middle, and lay another large piece of wax paper over the top. Use a rolling pin to roll the dough out to a flat, thin piece.  Use a knife to cut out a long rectangle the width of a store-bought toaster pastry, but twice as long.  Spoon out some jam into the middle of one side of the rectangle.  Be sure to keep the jam about 1/4 inches away from the edges.  Fold the other half of the pastry over the jam side and use a fork to press the 4 edges together.  The dough should be enough to make 4 toaster pastries.

Lay the toaster pastries in a single layer on a cookie sheet sprayed with non-stick cooking spray.   Use a knife to cut a couple of slits in the tops of each pastry, and sprinkle Sugar in the Raw on them.  Bake them in the oven for 15 minutes.  Eat them right away, or let them cool completely before laying them in a single layer in a large Ziplock freezer bag.  When you want to have one, take it out of the freezer, microwave it for 20 seconds on High, then put it in the toaster.  I use two knives (one on either side of the pastry) like tongs to remove it from the toaster when done since they are so flaky.

Friday, 4 April 2014

Cinnamon Roll Couronne

Cinnamon Roll Couronne
Couronne is the French word for crown and these types of ring breads are common in French bakeries. When I saw one being prepared on a British baking show recently in a twisted version, I thought to myself that that would be a very nice thing to do in a cinnamon roll version. With Easter brunch coming up, I decided to experiment with it to see if it would make a pretty addition to the table.

I love this particular version of cinnamon rolls, so I had no worries about using this recipe and the look of the finished couronne was absolutely beautiful. A little drizzle of vanilla glaze over the circular loaf and it made an absolutely perfect centerpiece for my brunch table. I was really pleased that it turned out so well and happy that I had taken enough photos of the process to be able to share it with my readers.

It really isn't all that difficult, especially if you are familiar with making your own cinnamon rolls. It is essentially just a couple of added steps to that process to create this gorgeous presentation. When your guests see this showstopper arrive at the table they are sure to be be impressed and very grateful for the invitation.

Cinnamon Roll Couronne
Cinnamon Roll CouronneCinnamon Roll Couronne
Cinnamon Roll Couronne
  • 1 ¼ cups warm milk
  • 3 cups all purpose flour
  • 1 pkg (5 g) instant dry yeast
  • 3 tbsp melted butter
  • 2 tsp vanilla extract
  • ¼ tsp salt
  • ¼ cup sugar
  • 2 eggs, slightly beaten

Combine 2 cups of the flour along with the sugar, instant yeast and salt in a large bowl or in the bowl of a large electric mixer that uses a dough hook. Add the melted butter, warm milk, eggs and vanilla extract. Using a wooden spoon or the regular paddle of your electric mixer beat for 4-5 minutes until the mixture is smooth with no lumps. If using an electric mixer, switch to the dough hook at this point and begin to slowly incorporate the remaining 1 cup of flour. If not using an electric mixer keep mixing in the flour gradually until a soft dough forms that leaves the sides of the bowl. You may need to use a little less or a little more flour, this is not uncommon. Knead the dough for an additional 10 minutes either in the electric mixer or on a bread board or counter top

Cover dough and leave to rest and rise for 30 minutes to one hour.

Punch the dough down and knead it for a few minutes by hand before letting it rest for another 10 minutes.

Use the photos provided as a guide to the process described to form the couronne.

Roll the rested dough out into a large rectangle about 12x 24 inches.

Combine:
  • 1 1/4 cups brown sugar
  • 2/3 cup very soft butter
  • 3 tsp cinnamon
Spoon the mixture evenly over the surface of the rolled out dough and spread it to about a half inch from the the edges. Sprinkle on:
  • 1 to 1 1/2 cups golden raisins (optional)
Starting at the long side of the rectangle, roll the dough into a log, pinching the dough together to seal at the long seam of the roll.

Cut the log in half lengthwise, laying the two pieces of dough side by side on the counter top, with both cut sides facing up. Start lifting one pice of dough over the other to form the twist, being careful to keep the cut sides pointing upward as much as you can. Form the fully twisted dough into a circle, tucking the ends of the roll under each other.  Transfer the couronne onto a large parchment lined baking sheet at least 12 inches wide. I used a 14 inch flat sheet with no sides which works best.

Cover the baking pan with a clean tea towel and allow the couronne to rise until at least doubled in size, about 1 1/2 hours.

Bake at 350 degrees F for 40-45 minutes or until evenly golden brown all over. Cool for about 20 minutes before drizzling with vanilla glaze and serving warm.

Vanilla Glaze
  • 1 cup icing sugar
  • ½ tsp vanilla extract
  • 2 tbsp milk

Whisk all three ingredients together until smooth and drizzle over the couronne.
Cinnamon Roll Couronne

Friday, 28 March 2014

Proper English Scones

Proper English Scones
For those of us here in Canada and the US, if you go looking for a recipe for good English scones, you will often be met with the imprecise task of converting the weight measurements that are always used in British recipes into the cup measurements that we use in North America. You also have to sometimes deal with ingredients like self raising flour which I've never actually used in 40 years of baking.

This recipe demystifies the process for you, using our more familiar measurement system in a tried and true recipe that I've used for years. There are plenty of other scone recipes on Rock Recipes but I don't use eggs in most of my scones because I prefer the textural difference of the crispier edges against the soft tender baked inside. This recipe does include egg for a softer scone which goes so beautifully well with jam and cream.

This is rather a small batch and the scones themselves are small, using my smallest biscuit cutter. If you need more however the recipe is easily doubled without affecting the texture of your scones. The dainty size is quite nice for afternoon tea but if you like them larger, you can also just form the dough into a circle about 3/4 inch thick and cut it with a sharp knife into 8 wedges like pieces of pie. These will take a little longer to bake; about 20 minutes. The larger size is quite nice to serve at a weekend brunch but any way you enjoy them, you're sure to make these again and again.


Proper English Scones

Recipe by Barry C. Parsons

A proper English scones recipe using North American measurements instead of weight measures. Perfect with thick cream and your favorite homemade jam.

Prep time: 10 minutes
Cook time: 15 minutes
Total time: 25 minutes
Yield: 18 1 1/2 inch scones

Ingredients
  • 1 2/3 cups all purpose flour
  • 2 1/2 tsp baking powder
  • 3 tbsp white sugar
  • pinch table salt table salt
  • 3 tbsp butter
  • 1/2 cup milk
  • 1/2 tsp vanilla extract (optional)
  • 1 egg
Instructions
  1. Preheat oven to 400 degrees F.
  2. In a food processor add the flour, baking powder, sugar, and salt. Pulse to mix together well. (You can just mix the ingredients in a bowl if you prefer the manual method)
  3. Pulse in the butter until the mixture resembles a coarse meal. (or just use your fingertips to rub the butter through the dry ingredients until the same texture is achieved.)
  4. Whisk together the milk, egg and vanilla. Reserve a few teaspoons of the liquid to brush on top of the scones. This helps them brown nicely)
  5. Add the liquid to the dry ingredients and stir in quickly with a wooden spoon until a soft dough forms. It should be a little sticky. Don't over work the dough or your scones will get tough and not rise well.
  6. Turn the dough out onto a well floured board or counter top.
  7. Lightly sprinkle the top of the dough with flour and just using your hands, form the dough into a round about 3/4 of an inch thick.
  8. Using a 1 1/2 inch biscuit cutter, cut out your scones and place them about 2 inches apart on a parchment lined baking sheet.
  9. Re-roll the scraps and cut out the rest of the scones. Brush the tops of all the scones with the reserved milk and egg liquid.
  10. Pop the scones into the hot oven for about 12-15 minutes or until the tops of the scones are evenly browned. Cool on a wire rack.
  11. Serve with thick or clotted cream and your favorite jam. 
Proper English Scones

Tuesday, 4 March 2014

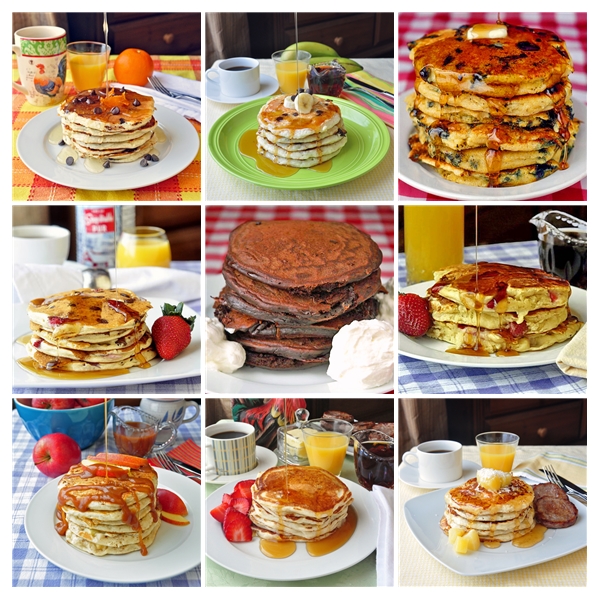
Ten Top Tips for Perfect Pancakes

 Rock Recipes Best Pancakes - get all these recipes.
Rock Recipes best Pancakes!

A fan on our Facebook Page said she never has success with homemade pancakes so I decided to write this article with my best tips for perfect pancakes. It's the way I've taught my kids to make them and they have been doing so perfectly since they were 8 or 9 years old. Olivia and Noah are the real pancake experts in our house now with chocolate chip pancakes often on their weekend brunch agendas.

Here are our essential tips to make perfect pancakes.

1. Start with a good recipe. I've found that too many recipes produce a batter that is either too thick or too thin. Pancake batter should be on the the thicker side but should still flow pretty well. This helps make a fluffier pancake. A closer  balance between the dry and wet ingredients works best in my experience. Recipes with much more dry ingredients than wet or wet than dry I often find problematic. Too much liquid means rubbery pancakes; too much dry means hard to cook pancakes. I think my version of Basic Buttermilk Pancakes gets it just right.

2. Use buttermilk in your recipe even if it calls for regular milk. The higher acid content in the milk reacts with the baking powder causing a quick lift to the batter, which means lighter, fluffier pancakes. If you don't have access to buttermilk make an easy substitution is to add a tablespoon of lemon juice for each cup of milk in the recipe.

3. To avoid bland pancakes add a teaspoon of pure vanilla extract to any pancake recipe. Vanilla is to baking what salt is to cooking; I call it a seasoning for baking and that goes for pancakes too. It improves both flavor and aroma and that scent will bring the family to the table even faster.

4. Pay close attention to the amount of baking powder in your recipe. While my general rule of thumb for cakes is 1 tsp of baking powder per cup of flour, pancake batters generally benefit from more leavening agent. About 1 1/2 tsp of baking powder per cup of flour is best. If your recipe calls for both baking powder and baking soda, the soda should be adjusted proportionally as well. Be careful about using too much baking soda, it can leave an unpleasant aftertaste if overused.

5. Do not use a lot of fat or oil to cook your pancakes. Light batters, like those for pancakes, absorb oil far too easily and you can quickly end up with greasy pancakes that have soaked up too much. I generally don't add any more than a teaspoonful to a well seasoned skillet if that's what I'm using, and then brush it around the bottom of the pan using a silicone pastry brush. If using a non stick electric griddle, or other non stick pan, its best to use only very little and wipe off the excess with a few paper towels folded into multiple layers.

6. Avoid high heat. Pancakes that are cooked at too high a temperature will brown too quickly while being gooey on the inside. On the stove top, when using a well seasoned skillet, between medium low and medium on my burner dial is the sweet spot. Start there and tweak it to find the sweet spot on your stove by cooking one pancake at a time until you find the perfect setting; then be sure to write the pan you used and the burner setting right on the recipe page for next time. An electric flat griddle is ideal for pancakes; if you have one use it and try to find the same sweet spot on the dial. On mine it's between 375 and 400 degrees.

7. Avoid recipes that use too much sugar in the batter. Since we serve pancakes with sweet syrup anyway, the pancakes themselves need not be very sweet at all. My basic buttermilk batter uses only a few tablespoons of sugar in the entire batch. Sugar caramelizes quickly and the more that's in the batter, the more quickly it will brown and often over brown before the center is properly cooked.

8. Wait for those bubbles. A pancake most often will take more time to cook on the first side than when flipped onto the second side. The best way to ensure a fully cooked pancake is to wait for bubbles to break the surface before flipping. Just take an occasional peek on the bottom to make sure they are not over browning.

9. Do not over mix the batter and never re-mix it after the initial mixing; this will deflate the batter and make dense pancakes. I don't ever use an electric mixer to make pancake batter. About 30 seconds of rapid hand whisking once everything is in the bowl is all it takes. Small lumps are not even a problem. Make the batter in two or more batches if you are serving many people. Smaller batches of batter are better and are less likely to tempt you to mix them again.

10. Once you have that minimal mixing done. Let the batter rest for 5- 10 minutes before using it. This gives the batter a chance to relax and let the baking powder do its work. The batter will be lighter and fluffier and so will your pancakes.

HAPPY PANCAKE DAY!!
Ten Top Tips for Perfect Pancakes