Showing posts with label brunch. Show all posts

Friday, 4 April 2014

Cinnamon Roll Couronne

Cinnamon Roll Couronne
Couronne is the French word for crown and these types of ring breads are common in French bakeries. When I saw one being prepared on a British baking show recently in a twisted version, I thought to myself that that would be a very nice thing to do in a cinnamon roll version. With Easter brunch coming up, I decided to experiment with it to see if it would make a pretty addition to the table.

I love this particular version of cinnamon rolls, so I had no worries about using this recipe and the look of the finished couronne was absolutely beautiful. A little drizzle of vanilla glaze over the circular loaf and it made an absolutely perfect centerpiece for my brunch table. I was really pleased that it turned out so well and happy that I had taken enough photos of the process to be able to share it with my readers.

It really isn't all that difficult, especially if you are familiar with making your own cinnamon rolls. It is essentially just a couple of added steps to that process to create this gorgeous presentation. When your guests see this showstopper arrive at the table they are sure to be be impressed and very grateful for the invitation.

Cinnamon Roll Couronne
Cinnamon Roll CouronneCinnamon Roll Couronne
Cinnamon Roll Couronne
  • 1 ¼ cups warm milk
  • 3 cups all purpose flour
  • 1 pkg (5 g) instant dry yeast
  • 3 tbsp melted butter
  • 2 tsp vanilla extract
  • ¼ tsp salt
  • ¼ cup sugar
  • 2 eggs, slightly beaten

Combine 2 cups of the flour along with the sugar, instant yeast and salt in a large bowl or in the bowl of a large electric mixer that uses a dough hook. Add the melted butter, warm milk, eggs and vanilla extract. Using a wooden spoon or the regular paddle of your electric mixer beat for 4-5 minutes until the mixture is smooth with no lumps. If using an electric mixer, switch to the dough hook at this point and begin to slowly incorporate the remaining 1 cup of flour. If not using an electric mixer keep mixing in the flour gradually until a soft dough forms that leaves the sides of the bowl. You may need to use a little less or a little more flour, this is not uncommon. Knead the dough for an additional 10 minutes either in the electric mixer or on a bread board or counter top

Cover dough and leave to rest and rise for 30 minutes to one hour.

Punch the dough down and knead it for a few minutes by hand before letting it rest for another 10 minutes.

Use the photos provided as a guide to the process described to form the couronne.

Roll the rested dough out into a large rectangle about 12x 24 inches.

Combine:
  • 1 1/4 cups brown sugar
  • 2/3 cup very soft butter
  • 3 tsp cinnamon
Spoon the mixture evenly over the surface of the rolled out dough and spread it to about a half inch from the the edges. Sprinkle on:
  • 1 to 1 1/2 cups golden raisins (optional)
Starting at the long side of the rectangle, roll the dough into a log, pinching the dough together to seal at the long seam of the roll.

Cut the log in half lengthwise, laying the two pieces of dough side by side on the counter top, with both cut sides facing up. Start lifting one pice of dough over the other to form the twist, being careful to keep the cut sides pointing upward as much as you can. Form the fully twisted dough into a circle, tucking the ends of the roll under each other.  Transfer the couronne onto a large parchment lined baking sheet at least 12 inches wide. I used a 14 inch flat sheet with no sides which works best.

Cover the baking pan with a clean tea towel and allow the couronne to rise until at least doubled in size, about 1 1/2 hours.

Bake at 350 degrees F for 40-45 minutes or until evenly golden brown all over. Cool for about 20 minutes before drizzling with vanilla glaze and serving warm.

Vanilla Glaze
  • 1 cup icing sugar
  • ½ tsp vanilla extract
  • 2 tbsp milk

Whisk all three ingredients together until smooth and drizzle over the couronne.
Cinnamon Roll Couronne

Friday, 28 March 2014

Proper English Scones

Proper English Scones
For those of us here in Canada and the US, if you go looking for a recipe for good English scones, you will often be met with the imprecise task of converting the weight measurements that are always used in British recipes into the cup measurements that we use in North America. You also have to sometimes deal with ingredients like self raising flour which I've never actually used in 40 years of baking.

This recipe demystifies the process for you, using our more familiar measurement system in a tried and true recipe that I've used for years. There are plenty of other scone recipes on Rock Recipes but I don't use eggs in most of my scones because I prefer the textural difference of the crispier edges against the soft tender baked inside. This recipe does include egg for a softer scone which goes so beautifully well with jam and cream.

This is rather a small batch and the scones themselves are small, using my smallest biscuit cutter. If you need more however the recipe is easily doubled without affecting the texture of your scones. The dainty size is quite nice for afternoon tea but if you like them larger, you can also just form the dough into a circle about 3/4 inch thick and cut it with a sharp knife into 8 wedges like pieces of pie. These will take a little longer to bake; about 20 minutes. The larger size is quite nice to serve at a weekend brunch but any way you enjoy them, you're sure to make these again and again.


Proper English Scones

Recipe by Barry C. Parsons

A proper English scones recipe using North American measurements instead of weight measures. Perfect with thick cream and your favorite homemade jam.

Prep time: 10 minutes
Cook time: 15 minutes
Total time: 25 minutes
Yield: 18 1 1/2 inch scones

Ingredients
  • 1 2/3 cups all purpose flour
  • 2 1/2 tsp baking powder
  • 3 tbsp white sugar
  • pinch table salt table salt
  • 3 tbsp butter
  • 1/2 cup milk
  • 1/2 tsp vanilla extract (optional)
  • 1 egg
Instructions
  1. Preheat oven to 400 degrees F.
  2. In a food processor add the flour, baking powder, sugar, and salt. Pulse to mix together well. (You can just mix the ingredients in a bowl if you prefer the manual method)
  3. Pulse in the butter until the mixture resembles a coarse meal. (or just use your fingertips to rub the butter through the dry ingredients until the same texture is achieved.)
  4. Whisk together the milk, egg and vanilla. Reserve a few teaspoons of the liquid to brush on top of the scones. This helps them brown nicely)
  5. Add the liquid to the dry ingredients and stir in quickly with a wooden spoon until a soft dough forms. It should be a little sticky. Don't over work the dough or your scones will get tough and not rise well.
  6. Turn the dough out onto a well floured board or counter top.
  7. Lightly sprinkle the top of the dough with flour and just using your hands, form the dough into a round about 3/4 of an inch thick.
  8. Using a 1 1/2 inch biscuit cutter, cut out your scones and place them about 2 inches apart on a parchment lined baking sheet.
  9. Re-roll the scraps and cut out the rest of the scones. Brush the tops of all the scones with the reserved milk and egg liquid.
  10. Pop the scones into the hot oven for about 12-15 minutes or until the tops of the scones are evenly browned. Cool on a wire rack.
  11. Serve with thick or clotted cream and your favorite jam. 
Proper English Scones

Tuesday, 4 March 2014

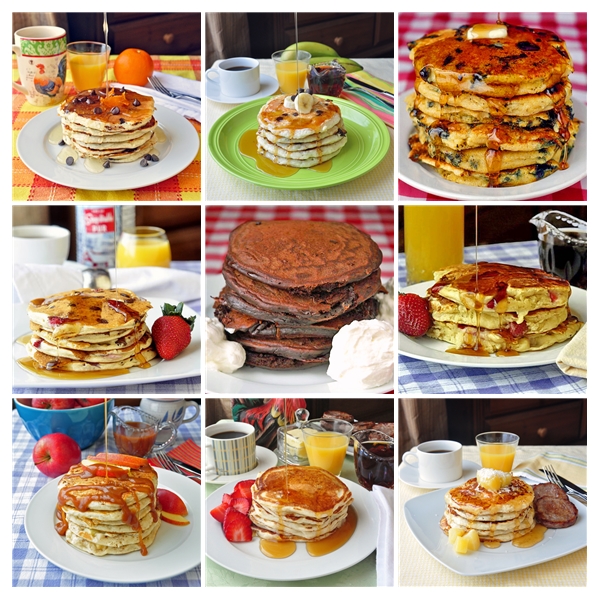
Ten Top Tips for Perfect Pancakes

 Rock Recipes Best Pancakes - get all these recipes.
Rock Recipes best Pancakes!

A fan on our Facebook Page said she never has success with homemade pancakes so I decided to write this article with my best tips for perfect pancakes. It's the way I've taught my kids to make them and they have been doing so perfectly since they were 8 or 9 years old. Olivia and Noah are the real pancake experts in our house now with chocolate chip pancakes often on their weekend brunch agendas.

Here are our essential tips to make perfect pancakes.

1. Start with a good recipe. I've found that too many recipes produce a batter that is either too thick or too thin. Pancake batter should be on the the thicker side but should still flow pretty well. This helps make a fluffier pancake. A closer  balance between the dry and wet ingredients works best in my experience. Recipes with much more dry ingredients than wet or wet than dry I often find problematic. Too much liquid means rubbery pancakes; too much dry means hard to cook pancakes. I think my version of Basic Buttermilk Pancakes gets it just right.

2. Use buttermilk in your recipe even if it calls for regular milk. The higher acid content in the milk reacts with the baking powder causing a quick lift to the batter, which means lighter, fluffier pancakes. If you don't have access to buttermilk make an easy substitution is to add a tablespoon of lemon juice for each cup of milk in the recipe.

3. To avoid bland pancakes add a teaspoon of pure vanilla extract to any pancake recipe. Vanilla is to baking what salt is to cooking; I call it a seasoning for baking and that goes for pancakes too. It improves both flavor and aroma and that scent will bring the family to the table even faster.

4. Pay close attention to the amount of baking powder in your recipe. While my general rule of thumb for cakes is 1 tsp of baking powder per cup of flour, pancake batters generally benefit from more leavening agent. About 1 1/2 tsp of baking powder per cup of flour is best. If your recipe calls for both baking powder and baking soda, the soda should be adjusted proportionally as well. Be careful about using too much baking soda, it can leave an unpleasant aftertaste if overused.

5. Do not use a lot of fat or oil to cook your pancakes. Light batters, like those for pancakes, absorb oil far too easily and you can quickly end up with greasy pancakes that have soaked up too much. I generally don't add any more than a teaspoonful to a well seasoned skillet if that's what I'm using, and then brush it around the bottom of the pan using a silicone pastry brush. If using a non stick electric griddle, or other non stick pan, its best to use only very little and wipe off the excess with a few paper towels folded into multiple layers.

6. Avoid high heat. Pancakes that are cooked at too high a temperature will brown too quickly while being gooey on the inside. On the stove top, when using a well seasoned skillet, between medium low and medium on my burner dial is the sweet spot. Start there and tweak it to find the sweet spot on your stove by cooking one pancake at a time until you find the perfect setting; then be sure to write the pan you used and the burner setting right on the recipe page for next time. An electric flat griddle is ideal for pancakes; if you have one use it and try to find the same sweet spot on the dial. On mine it's between 375 and 400 degrees.

7. Avoid recipes that use too much sugar in the batter. Since we serve pancakes with sweet syrup anyway, the pancakes themselves need not be very sweet at all. My basic buttermilk batter uses only a few tablespoons of sugar in the entire batch. Sugar caramelizes quickly and the more that's in the batter, the more quickly it will brown and often over brown before the center is properly cooked.

8. Wait for those bubbles. A pancake most often will take more time to cook on the first side than when flipped onto the second side. The best way to ensure a fully cooked pancake is to wait for bubbles to break the surface before flipping. Just take an occasional peek on the bottom to make sure they are not over browning.

9. Do not over mix the batter and never re-mix it after the initial mixing; this will deflate the batter and make dense pancakes. I don't ever use an electric mixer to make pancake batter. About 30 seconds of rapid hand whisking once everything is in the bowl is all it takes. Small lumps are not even a problem. Make the batter in two or more batches if you are serving many people. Smaller batches of batter are better and are less likely to tempt you to mix them again.

10. Once you have that minimal mixing done. Let the batter rest for 5- 10 minutes before using it. This gives the batter a chance to relax and let the baking powder do its work. The batter will be lighter and fluffier and so will your pancakes.

HAPPY PANCAKE DAY!!
Ten Top Tips for Perfect Pancakes

Monday, 3 March 2014

Rock Recipes Best Pancakes

Chocolate Chip Buttermilk Pancakes with Orange Infused Syrup

  Chocolate Chip Buttermilk Pancakes with Orange Infused Syrup
  Chocolate Chip Buttermilk Pancakes with Orange Infused Syrup
Regular followers of Rock Recipes knew this was bound to happen. My ongoing love affair with the flavor combination of chocolate and orange continues with these amazing weekend brunch pancakes. When I began making flavored homemade syrups to serve with pancakes, an orange version was one of the first ideas that came into my head. The little splash of vanilla at the end gives it just a little extra floral flavor boost too.

Even without the orange syrup, these are great chocolate chip pancakes that any kid would love. My kids have been eating them their whole lives and have long taken over the pancake making duties in this household.


Chocolate Chip Buttermilk Pancakes with Orange Infused Syrup

Recipe by Barry C. Parsons

Making your own orange infused syrup to serve with pancakes is very easy and makes any occasion at which you serve these light and fluffy, delicious chocolate chip pancakes just a bit more special. 

Prep time: 20 minutes
Cook time: 7 minutes
Total time: 27 minutes
Yield: 12 large pancakes

Ingredients
  • 1 3/4 cups flour
  • 1/2 tsp salt
  • 3 tbsp sugar
  • 3 tsp baking powder
  • 1/2 tsp baking soda
  • 1 egg
  • 3 tsp vanilla extract
  • 1 3/4 cups buttermilk
  • 4 tbsp melted butter
  • 1/2 cups chocolate chips (approximately)
  • ORANGE SYRUP
  • 3/4 cup sugar
  • 2 tbsp corn syrup
  • 1/2 cup water
  • zest of one orange chopped in strips
  • 1 tsp vanilla extract
Cooking Directions
  1. Sift together the flour, salt, sugar, baking powder and baking soda.
  2. Whisk together the egg, vanilla extract, buttermilk and melted butter.
  3. Pour the wet mixture over the dry ingredients and whisk together just until combined. Do not over mix. Don't worry about small lumps. The batter will be thick.
  4. Using a 1/4 cup measure, pour batter onto a lightly greased griddle on medium heat; it's best to cook these slowly. You may need to spread the batter out a little with the back of a spoon but this is usually not necessary.
  5. Sprinkle on some chocolate chips before flipping. Cook for 3-4 minutes per side or until the center is fully cooked.
  6. To make the ORANGE INFUSED SYRUP, in a small saucepan bring the water, sugar, corn syrup to a slow simmer. Add the strips of orange zest.
  7. Continue to cook at a slow simmer until the mixture reaches 230 degrees F on a candy or meat thermometer. Remove from the heat and stir in the vanilla extract.
  8. Allow the syrup to cool to almost room temperature before serving over the pancakes. You can remove the candied orange zest and use it to garnish the pancakes.

Caramel Apple Buttermilk Pancakes

Caramel Apple Buttermilk Pancakes
Apples are one of the things most commonly added to pancakes at our house, so when I was thinking about recipe ideas to feature for the upcoming annual Pancake Day, these came to mind but how to make these pancakes just a little different? The answer? Forget maple syrup or that artificially flavored store bought stuff, everyone knows that apples love caramel! Our wickedly good Homemade Caramel Sauce has appeared in many of our indulgent desserts here on Rock Recipes and it was just the thing to take these wonderful pancakes to the next level. 

It was so indulgently good that I plan on making this pancake idea for dessert next time with a scoop of vanilla bean ice cream. I'll get back to you with the reviews when I do.

You can find our Homemade Caramel Sauce Recipe by clicking here.

Caramel Apple Buttermilk Pancakes

Recipe by Barry C. Parsons

Sweet apple pieces are cooked right into these light and fluffy pancakes and get saved with the best homemade caramel sauce of your dreams. This is so indulgently delicious, I'd even suggest adding a scoop of vanilla bean ice cream and serving it on occasion as an amazing dessert!

Prep time: 10 minutes
Cook time: 7 minutes
Total time: 17 minutes
Yield: 12 large pancakes
Ingredients
  • 1 3/4 cups flour
  • 1/2 tsp salt
  • 3 tbsp sugar
  • 3 tsp baking powder
  • 1/2 tsp baking soda
  • 1 egg
  • 3 tsp vanilla extract
  • 1 3/4 cups buttermilk
  • 4 tbsp melted butter
  • 1/2 cups chocolate chips (approximately)
  • 2 medium apples, peeled and diced
  • few pinches ground cinnamon
Cooking Directions
  1. Sift together the flour, salt, sugar, baking powder and baking soda.
  2. Whisk together the egg, vanilla extract, buttermilk and melted butter.
  3. Pour the wet mixture over the dry ingredients and whisk together just until combined. Do not over mix. Don't worry about small lumps. The batter will be thick.
  4. Using a 1/4 cup measure, pour batter onto a lightly greased griddle on medium heat; it's best to cook these slowly. You may need to spread the batter out a little with the back of a spoon but this is usually not necessary.
  5. Sprinkle on some diced apple pieces and sprinkle each pancake with ground cinnamon before flipping. Cook for 3-4 minutes per side or until the center is fully cooked.

Best Basic Buttermilk Pancakes

Best Basic Buttermilk Pancakes
A good basic buttermilk pancake recipe is a useful thing indeed. I've tweaked this recipe to be extra light and fluffy and so simple to prepare that considering using a pancake mix will never be a real need ever again and so quick that you may even be making them on weekday mornings. Add fresh berries in season or chocolate chips like my kids do throughout the year for a weekend brunch treat that will have 'em rushing to the table.

Best Basic Buttermilk Pancakes

Recipe by Barry C. Parsons

A basic recipe for a weekend brunch staple, light, fluffy, delicious buttermilk pancakes. This is a terrific basic recipe to which you can add your favorite berries or as my kids mostly do, chocolate chips. I find it best to sprinkle the berries or chocolate chips on the pancakes while they are on the grill before you flip them for best even distribution in every bite.

Prep time: 10 minutes
Cook time: 7 minutes
Total time: 17 minutes
Yield: 12 large pancakes
Ingredients
  • 1 3/4 cups flour
  • 1/2 tsp salt
  • 3 tbsp sugar
  • 3 tsp baking powder
  • 1/2 tsp baking soda
  • 1 egg
  • 2 tsp vanilla extract
  • 1 3/4 cups buttermilk
  • 4 tbsp melted butter
Cooking Directions
  1. Sift together the flour, salt, sugar, baking powder and baking soda.
  2. Whisk together the egg, vanilla extract, buttermilk and melted butter.
  3. Pour the wet mixture over the dry ingredients and whisk together just until combined. Do not over mix. Don't worry about small lumps. The batter will be thick.
  4. Using a 1/4 cup measure, pour batter onto a lightly greased griddle on medium heat; it's best to cook these slowly. You may need to spread the batter out a little with the back of a spoon but this is usually not necessary. Cook for 3-4 minutes per side or until lightly browned on both sides and the center is fully cooked.

Pina Colada Pancakes with Vanilla Rum Syrup

Pina Colada Pancakes with Vanilla Rum Syrup
With the annual Shrove Tuesday Pancake Day feast around the corner, I've been experimenting with making my own flavor infused syrups to serve with them. When I spied the remnants of a bottle of dark rum that was unlikely to be used for anything else, I took that as my inspiration. Rum of course invokes tropical flavor thoughts, maybe because of the cold winter weather outside so I thought why not Pina Colada Pancakes? Why not indeed. They turned out incredibly delicious. No doubt they will make return appearances at weekend brunches throughout the year.


Pina Colada Pancakes with Vanilla Rum Syrup


A bit of an adult flavor combination in this delicious brunch dish but since the alcohol is completely cooked off the kids can enjoy it too; or just serve theirs with maple syrup. A great recipe for annual Pancake Day.

Prep time: 10 minutes
Cook time: 5 minutes
Total time: 15 minutes
Yield: About 18 large pancakes
Ingredients
  • 2 cups flour
  • 4 tsp baking powder
  • ¼ tsp salt
  • ¼ cup sugar sugar
  • 2 cups milk
  • ¼ cup sour cream
  • 2 eggs
  • 4 tbsp melted butter
  • 2 tsp vanilla extract
  • 1/2 cup unsweetened dessicated coconut
  • 1 cup fresh pineapple, diced small
  • VANILLA RUM SYRUP
  • 3/4 cup sugar
  • 2 tbsp corn syrup
  • 3/4 cup water
  • 1 small vanilla bean
  • 1/4 cup dark rum
Cooking Directions
  1. Sift together the flour, baking powder, sugar and salt.
  2. Add the milk, sour cream, eggs and vanilla and whisk together until their are no lumps left.
  3. Stir in the pineapple and coconut.
  4. Pour by ¼ cup measures onto a heated and oiled griddle.
  5. When bubbles break the surface of the pancakes flip them and cook for another 2-3 minutes or until golden brown. Serve with Vanilla Rum Syrup.
  6. For the Vanilla Rum Syrup, in a small saucepan bring the water, sugar, corn syrup to a slow simmer. Split the vanilla bean in half lengthwise and scrape out the seeds, adding them to the pot along with the vanilla pod. The pod can be removed later. Let this boil for 5 minutes then add the rum and continue to cook until the mixture reaches 230 degrees F on a candy or meat thermometer.
  7. Allow the syrup to cool to almost room temperature before removing the vanilla pod pieces and serving over the pancakes.

Saturday, 22 February 2014

Steak and Eggs Benedict with Brown Butter Sriracha Hollandaise Sauce

Steak and Eggs Benedict with Brown Butter Sriracha Hollandaise Sauce
I have to confess that this recipe was made just for me. My love of brunch has been well established here on Rock Recipes and this one combines some of my very favorite ingredients. I am an absolute steak addict, so much so that while many people say they couldn't be vegetarian because they couldn't live without bacon, I would equally miss a juicy, medium rare grilled steak. Like many people I know who enjoy breakfast for dinner, steak and eggs tops my list on those occasions; add to that our family's favorite buttermilk biscuits plus rich, creamy, brown butter Hollandaise sauce with a hit of sweet heat from sriracha sauce and this brunch is a complete brunch home run.

I used my recent recipe for Coffee Chipotle Rubbed Grilled Steak  in this particular version which was really delicious but you can use any grilled, sliced steak. I'd recommend using 3 to 4 ounces per person. I love poached eggs but Spouse doesn't so she can attest that this recipe is just as delicious with scrambled eggs instead.

You can of course use toasted English muffins as the base of this brunch idea  but if you have an extra half hour, you can find our easy to make flaky buttermilk biscuit recipe here.

Brown Butter Sriracha Hollandaise Sauce

  • 3 egg yolks
  • 1/2 teaspoon yellow mustard
  • 2 tablespoons lemon juice
  • 1 tsp chopped lemon zest
  • 1/2 cup hot brown butter
  • 1 tbsp sriracha sauce
To brown butter just melt it in a small saucepan over medium heat and watch it until the color turns light golden brown. Pour it off immediately into a heat proof measuring cup, leaving the sediment behind.
 
In a blender combine the egg yolks, mustard and lemon zest and juice for only a few seconds. With the blender on medium speed, slowly pour in the hot butter in a thin stream. The sauce should thicken quite quickly. Pour into a bowl and keep the bowl warm in a warm water bath while preparing the steak and eggs.


Thursday, 23 January 2014

Old Fashioned Cinnamon Rolls

Old Fashioned Cinnamon Rolls
When I first started baking many years ago, I loved making bread in particular. Long before I had ever heard of a soft, sweet brioche brioche dough, which is the base for my cinnamon rolls these days, I would make them from leftover white bread dough just like our Grandmothers did. The rolls are not quite as sweet or light and airy but I have discovered that some people prefer a more substantial, chewy texture to their cinnamon rolls. One commercial bakery owner I knew made them this way and changed her recipe once to make them softer but her customers balked and asked that she go back to the old recipe. I think the more rustic recipe hit a nostalgic note with her customers which is why they were so popular.

I thought about that one recent weekend when I was making White Bread to go with my Pulled Pork Baked Beans and decided to take part of the dough to make these old fashioned cinnamon rolls. When you think of it, this is a great early morning weekend baking project because you get a pan of great rolls for brunch and a fresh loaf of bread to serve with dinner. ( you can also freeze the remaining dough for later if you prefer.)

Click here to find my standard White Bread recipe.
The bread recipe makes enough for the rolls plus a loaf of bread.


Once you make the dough, cover it and leave to rest and rise for one hour. Punch the dough down and knead it for a few minutes by hand before letting it rest for another 10 minutes.

Roll the rested dough our into a large rectangle about 12x18 inches.

Combine:

  • 1 cup brown sugar
  • ½ cup very soft butter
  • 2 tsp cinnamon

Spread this mixture on the rolled out dough. At this point you can make plain cinnamon rolls or, if desired, you can sprinkle on raisins, chopped pecans or walnuts, chopped apple pieces or any combination you like.

Starting at the short side of the rectangle, roll the dough into a log, pinching the dough together to seal at the end of the roll.

Cut the roll into 12 equal pieces and place in the bottom of a greased 9x13 baking pan.

(Note: For Sticky Buns combine 1 cup brown sugar and ½ cup melted butter in the bottom of the pan before adding the rolls. Invert onto a platter when baked.)

Cover the baking pan with a clean tea towel and allow the rolls to rise until at least doubled in size, about 1 to 1 ½ hours. (I sometimes let them rise in the fridge overnight and pop them into the oven in the morning. I’ve also frozen them before they rise and take them out of the freezer to rise overnight on the counter top before going to bed)

Bake at 350 degrees F for 30-35 minutes or until the rolls spring back when touched in the middle of the pan. Frost with vanilla glaze if desired.

Vanilla Glaze
  • 1 cup icing sugar
  • ½ tsp vanilla extract
  • 2 tbsp milk

Whisk all three ingredients together until smooth and drizzle over the cinnamon rolls.

Old Fashioned Cinnamon Rolls & White Bread

Thursday, 19 December 2013

Easy Homemade Breakfast Sausage

Easy Homemade Breakfast Sausage


I've recently started experimenting with making my own fresh sausages and I've been loving it. I really love sausages but I am always skeptical about the length of time some sausages spend in supermarket coolers. Seems like there must be a lot of preservatives in there to give them the kind of shelf life that some of them have printed on the label; plus you never know what they are using for binders and fillers. They are almost always way too salty for my taste too and I just want to feel a little better about indulging in one of my favorite things to serve for weekend brunch.

Southern style breakfast sausage is one of my favorites and I have been working on getting the seasoning just right in a good easy homemade version. I think this is it. Everyone loved this sausage, even the boy child who isn't a big fan in general. They even had them for lunch when they came home from school the next day, made into delicious breakfast sandwiches with the leftover Buttermilk Biscuits from the day before. Be sure you have plenty of those light flaky biscuits on hand to serve with this tasty sausage.

Make a larger batch to freeze for up to a couple of months and enjoy these at brunch for several weekends to come.
Easy Homemade Breakfast Sausage

Easy Homemade Breakfast Sausage

Recipe by Barry C. Parsons
Easy Homemade Breakfast Sausage - deliciously seasoned breakfast sausage with very little salt and no preservatives. Remarkably little effort is needed to make this easy, delicious sausage.

Prep time: 20 minutes
Cook time: 7 to 10 minutes
Total time: 30 minutes
Yield: 1 dozen sausage patties

Ingredients
  • 2 1/2 pounds ground pork shoulder or butt
  • 2 tsp smoked paprika
  • 2 tsp brown sugar
  • 1 tsp kosher salt
  • 1 tsp freshly ground black pepper
  • 1/2 tsp chili flakes
  • 1/2 tsp allspice
  • 1/2 tsp nutmeg
  • 2 tsp onion powder
  • 1 tsp garlic powder
  • 1 tsp marjoram (or oregano)
  • 1 tsp ground sage
  • pinch cayenne pepper (or more to taste)
  • 1 tsp dry thyme
Cooking Directions
  1. Mix the salt and spices together until well combined.
  2. Cut the pork into small cubes.
  3. Toss the pork cubes in the spice mixture until they are completely coated. (Note: If you are using pre-ground pork add it to a bowl a little at a time, sprinkling some of the spice mix between the layers before mixing together well. This ensures an even distribution of the spices throughout the sausage.)
  4. Coarsely grind the spiced pork cubes. Cover and place in the fridge for an hour or two or preferably overnight for the flavors to blend together.
  5. Form into 3 ounce patties and fry to lightly golden brown.
  6. If freezing the sausage, place each patty between 2 pieces of parchment paper to more easily separate them when frozen. Stack a few at a time and wrap in plastic wrap or place in ziploc bags to freeze. 
Easy Homemade Breakfast Sausage

    Sunday, 29 September 2013

    Crab Cakes Eggs Benedict

    Crab Cakes Eggs Benedict
    Crab Cakes Eggs Benedict
    In the very early days of Rock Recipes, actually in the first week, I featured one of my favorite Crab Cakes recipe which we sometimes serve in miniature form as delicious little finger food when friends come by in the evening for drinks. I decided to revisit the recipe this week in a terrific Eggs Benedict idea inspired by recent travels.

    Our family vacation this year was another road trip, this time up eating our way up the eastern seaboard from Savannah to Boston. I tried some crab cake Eggs Benedict along the way in Maryland and knew I'd be making this dish when I got home with a bit of a Newfoundland twist.

    Instead of an English muffin I've substituted our local favorite toutons and instead of the tarragon in the Hollandaise sauce, I used local Mt. Scio Savoury which I know may be an uncommon herb in may areas. Tarragon or dill will also make a delicious herb flavored Hollandaise if you can't find savoury. Any crab meat can be used. In Maryland I had blue crab cakes but I've used some delicious sweet Newfoundland snow crab in the version pictured.

    My crab cakes use only enough other ingredients to hold the crab together and the mixture will be quite soft when you roll it into cakes and then into the cracker crumb mixture. They do take a gentle touch but once they are fried they hold together well. This very indulgent recipe sure would be perfect for a celebration brunch or breakfast treat at the end of a hard week.

    Crab Cakes
    Crab Cakes
    You can always use English muffins or buttermilk biscuits as the base for this great dish. Find my recipe for Toutons at this link.


    Crab Cakes Eggs Benedict

    Recipe by Barry C. Parsons
    Maryland meets Newfoundland in this indulgent version of Eggs Benedict, perfect for a celebration brunch.
    Yield: 4 - 6 large crab cakes or about 18 hors d'ouevres
    Ingredients
    • 1 pound coarsely chopped (NOT MINCED) fresh or frozen cooked crab meat
    • 3/4 cup + 1 cup cracker crumbs
    • 4 tbsp mayonnaise
    • 1 tsp lemon zest, minced
    • 2 tsp Worcestershire Sauce
    • 1/2 tsp salt
    • 1/2 tsp pepper
    • 2 tsp hot sauce (optional)
    • 2 eggs, lightly beaten
    • Aprox 2/3 cup canola oil for frying
    • FOR THE HOLLANDAISE SAUCE
    • 3 egg yolks
    • 1/2 tsp yellow mustard (or Dijon if you prefer)
    • 1-2 tbsp lemon juice
    • 1/2 tsp dry summer savoury (or dill or tarragon)
    • 1/2 cup hot melted butter
    Cooking Directions
    1. Toss together the crab meat with the 3/4 cup cracker crumbs and all other ingredients except the canola oil.
    2. Form into cakes by hand to whatever size you prefer. (Small cakes make great hor’s d’ouevres).
    3. Roll in additional cracker crumbs.
    4. Heat about a half inch of canola oil in a skillet or sate pan over medium-low heat. You want these to fry gently, they will burn quickly if the oil is too hot.
    5. Fry until golden brown on both sides. Drain on paper towels.
    6. FOR THE HOLLANDAISE SAUCE
    7. In a blender combine the egg yolks, mustard and lemon juice for only a few seconds.
    8. With the blender on medium speed, slowly pour in the hot butter in a thin stream. The sauce should thicken quite quickly.
    9. Stir in the savoury. Pour into a bowl and keep the bowl warm in a warm water bath while preparing the other components of the Eggs Benedict.
    10. Place the cooked crab cakes on the warm toutons, top with a poached egg and finally the Hollandaise sauce.

    Sunday, 15 September 2013

    Lemon Sour Cream Tea Biscuits

    Lemon Sour Cream Tea Biscuits
    Lemon Sour Cream Tea Biscuits
    These fragrant little lemon morsels remind me of a formal afternoon English tea. I think they would fit right in beside the cucumber sandwiches and Victoria sponge cake. We enjoyed these this morning at brunch with some simple, freshly made Newfoundland wild blueberry jam and they were scrumptious. Some thick cream or clotted cream would also be wonderful on them.


    Lemon Sour Cream Tea Biscuits

    Recipe by Barry C. Parsons
    Light, airy little lemon tea biscuits that would be right at home at an afternoon tea.
    Prep time: 10 minutes
    Cook time: 15 minutes
    Total time: 25-30 minutes
    Yield: About 20 small biscuits.
    Ingredients
    • 2 cups all purpose flour
    • 1/4 cup sugar
    • 4 tsp baking powder
    • 1/4 tsp baking soda
    • 1/4 cup + 1 tbsp very cold butter
    • 1/2 cup sour cream
    • 1/2 cup milk
    • 1 tsp vanilla extract
    • 1 tbsp water
    • 1 egg
    • few tbsp turbinado sugar (optional)
    • Zest of one lemon, finely minced
    • pinch salt
    Cooking Directions
    1. Preheat oven to 400 degrees F.
    2. In a food processor, blend together the flour, sugar, baking powder, baking soda and lemon zest.
    3. Pulse in the butter.
    4. Do not over incorporate the butter into the flour. Similar to making a flaky pastry, small pieces of butter should be visible in the flour.
    5. Transfer this mixture from the food processor into a large mixing bowl and make a well in the center.
    6. Mix together the sour cream, milk and vanilla. Pour into the well.
    7. Working very quickly with a wooden spoon, fold the dry mixture through the buttermilk, only until the flour disappears, then stop immediately. Drop the sticky dough onto a well floured counter top or bread board. Sprinkle the top of the dough with additional flour as well as flouring your hands to handle the dough. I don't even use a rolling pin for these biscuits, the dough is soft enough to pat it out gently with floured hands to a thickness of about 3/4 inch. Using a small biscuit cutter cut the biscuits out an place them, 1 1/2 inches apart on a parchment paper lined baking sheet. I recommend an aluminum baking sheet because it tolerates the higher oven temperature without burning the bottom of the biscuits.
    8. Whisk together the water and egg and brush lightly over the top of the biscuits. You will only need a little of the egg wash mixture.
    9. Sprinkle with some turbinado sugar if desired.
    10. Bake for 13-15 minutes or until the tops are golden brown. Cool on a wire rack.
      Lemon Sour Cream Tea Biscuits
      Lemon Sour Cream Tea Biscuits - delicious with homemade blueberry jam.

    VIDEO RECIPE: Buttermilk Biscuits with Chorizo Sausage and Quick Tomato Compote


    For iPad and iPhone users, if the video does not load below please try this link on the CBC website.

    Here's the second installment in Rock Recipes video cooking series with CBC Newfoundland and Labrador. Regular readers know I love my Sunday Brunch and this recipe is a real stick-to-your- ribs kind of start to a busy weekend day. Check out how to make the lightest buttermilk biscuits and how to quickly and simply make some homemade chorizo sausage. Add some quick-cooked, fresh tomato compote and scrambled egg and you've got one outstanding brunch dish.


    Find the individual recipes in this dish at the links below: 

    Buttermilk Biscuits

    Chorizo Sausage

    Spicy Quick Tomato Compote 


    Friday, 6 September 2013

    Sunken Grape Almond Cake

    Sunken Grape Almond Cake
    Sunken Grape Almond Cake
    I saw this idea on an Italian cooking show some years ago where they made a grape cake to celebrate the beginning of the harvest. It came to mind this week when I saw some sweet and tart little Coronation grapes from southern Ontario which are in season right now. They are related to Concord grapes which, like any small grape variety could be easily substituted.

    I decided to use an almond cake recipe that I really like but unfortunately the batter was too light, rose too much and then sank in the center. It tasted delicious but looked a complete disaster. Back to the drawing board. Spouse's mom, Violet was here at the time and happily took the delicious but rough looking first attempt home to enjoy.  In contradiction to the popular phrase, I guess that ill wind actually did blow her some good. She seemed delighted to have it.

    Sunken Grape Almond Cake
    Sunken Grape Almond Cake

    I still had plenty of those tasty little grapes left over, so the next day, attempt number two got underway. I tweaked the amount of flour and baking powder in the recipe and within the first 20 minutes in the oven, it was clear this attempt was at least going to be a visual success. The proof was still in the tasting, of course and it turns out I had nothing to worry about on that count either; tender, buttery, nutty and with sweet and tart pops of flavor from the tiny grapes that had sunk into the center, it was perfectly delicious and just how I had imagined it would taste.

    It would be perfect at a weekend brunch or even as dessert at a special dinner. Like in my Pear and Almond Cake, this dessert would no doubt be excellent served with Creme Anglais or any good custard.


    Sunken Grape Almond Cake
    Sunken Grape Almond Cake
    Serves about 12

    Grease a 10 inch spring form pan and line the bottom with parchment paper for easy release of the cake after it is baked. Preheat oven to 325 degrees F.
    Sift together and set aside:

    • 1 cup toasted ground almonds
    • 1 1/4 cups sifted all purpose flour
    • 1/2 tsp baking powder
    • pinch salt

    I toast whole almonds in a preheated 350 degree oven for 5-8 minutes on a cookie sheet. tossing them at least once. I then grind them very finely in a food processor. Be sure to lightly pack the ground almonds into the measuring cup.

    Cream together until light and fluffy:

    • 1 cup butter
    • 1 1/3 cups sugar
    • 1 tsp vanilla extract
    • 1 tsp almond extract

    Beat in, one at a time:

    • 3 eggs

    Stir in:

    • zest of one small lemon, finely chopped

    Mix in the dry ingredients until smooth and spread the batter evenly into the prepared pan. Place small grapes all over the surface of the batter about a 1/4 inch (6mm) apart. Any variety of small grape will work or you can use small pitted cherries or large blueberries instead. Do not push them into the batter just drop them onto the surface. Bake for about 50-60 minutes or until evenly brown on top and a wooden toothpick inserted in the center comes out clean. Cool in the pan for 20 minutes before releasing the cake and cooling on a wire rack. If you are serving the cake warm, you should still wait the 20  minutes to allow it to settle before cutting.

    Sunken Grape Almond Cake
    Sunken Grape Almond Cake