Wednesday, 31 December 2008

French Toast Breakfast Bake with Glazed Apples

Here is an idea I sometimes use when serving a large breakfast or brunch crowd that won't have you chained to the stove flipping french toast all morning. You can serve any berry compote or fresh fruit or berries on top or as shown here, with these delicious glazed apples.

Serves 6

5 cups bread cubes (Use any good quality bread. I’ve used Brioche here but French, Italian or Belgian bread is good too.)

Grease an 8x8 inch baking dish well. Toss in the bread cubes in an even layer. Sprinkle the bread cubes with the rum soaked raisins along with the rum that they were soaked in. Sprinkle the bread cubes and raisins with

½ tsp freshly grated nutmeg

Whisk together:

½ cup whipping cream
½ cup milk
6 eggs
3 tbsp sugar
1 tbsp vanilla extract
Pinch salt

Pour the mixture evenly over the bread cubes, pressing down slightly to make sure all the cubes are soaked. Bake in a 370 degree oven for about 30 minutes or until the center is fully cooked. Serve with glazed apples.

Glazed Apples

Peel and cut into thick slices

8 large apples

In a large skillet melt

1/3 cup butter

Add
1 ½ tsp cinnamon
¾ cup light brown sugar

Cook until the sugar dissolves and the mixture is bubbly. Add the apples and sauté until the apples are just fork tender but not mushy; they should still be semi-firm in texture. Remove from heat. The idea here is to let the residual heat to partly cook the apples. Drain the apples in a colander for about a half hour, collecting the juice and syrup that drains off.

Return the juice and syrup that has drained off the cooked apples to the sauté pan and simmer over medium heat until the sauce gets very thick. In a large bowl, gently toss this sauce with the cooked apples and spoon onto the top of the French toast bake.

Sunday, 28 December 2008

Recipe Revisit: Turkey, Turkey and Oh Yeah Turkey

I may be one of the few who doesn't tire of turkey at the holiday season; I'm in for any turkey meal. Just in case you still have some of the festive fowl still hanging around the fridge, here are a few suggestions to make a meal from the leftovers:

Deep Fried Turkey
http://www.rockrecipes.blogspot.com/2008/02/deep-fried-turkey_15.html

Turkey Pot Pie
http://rockrecipes.blogspot.com/search/label/turkey%20pot%20pie

Turkey Parmesan Baked Rotini
http://rockrecipes.blogspot.com/2008/10/turkey-parmesan-baked-rotini.html

Turkey Stew
http://rockrecipes.blogspot.com/2008/04/turkey-stew.html

Savoury Biscuits for Turkey Stew
http://rockrecipes.blogspot.com/2008/08/savoury-biscuits.html

Turkey Agnolotti Soup
http://rockrecipes.blogspot.com/2007/10/turkey-agnolotti-soup.html

Wednesday, 24 December 2008

Chocolate Hummingbird Cheesecake

Chocolate Hummingbird Cheesecake
A little while back we featured a Carrot Cake Cheesecake that showed a cheesecake top baked at the same time on a cake base. This recipe is one that I came up with as another example of this method. I thought that a banana pecan cake like a hummingbird cake would make an excellent base for a a chocolate cheesecake and indeed it did turn out very well. My neighborhood taste testers gave this one very high marks. I think it would make a very nice dessert at any holiday meal.

Hummingbird Cake Base:
  • 1 ½ cups flour
  • ½ cup white sugar
  • ½ cup brown sugar
  • ¼ tsp salt
  • ½ tsp baking soda
  • ¾ tsp baking powder
  • 2 eggs
  • ½ cup canola oil
  • ½ cup roughly chopped toasted pecans
(Toast pecans for 5 minutes at 350 degrees for 5 minutes tossing twice before chopping)
  • 2 small bananas, ripe but firm NOT MUSHY (cut in quarters lengthways and cubed)
  • 1 tsp cinnamon
  • ½ tsp nutmeg
  • 1 tsp vanilla extract
  • ½ tsp butterscotch flavoring (optional)

PREPARATION:

Chocolate Hummingbird CheesecakePreheat oven to 350°. Grease a 9 or 10 inch springform pan and line bottom with parchment paper. Grease the paper as well and dust the pan lightly with flour.
Sift together flour, salt, baking soda, cinnamon and nutmeg.
Mix the sugars, eggs and oil until light and fluffy. Fold in the dry ingredients until not quite completely mixed. Finally fold in the chopped nuts and chopped bananas. Pour batter into the prepared pan.

Chocolate Cheesecake Top

  • 1 pound cream cheese
  • ¾ cup sugar
  • 2 eggs
  • 1 tsp vanilla extract
  • ¾ cup cocoa
  • ½ cup whipping cream

Blend together cream cheese, sugar, and cocoa. Add the eggs one at a time blending until smooth after each addition. Finally blend in the whipping cream and vanilla and mix until smooth.

Spoon the cheesecake mixture evenly over the Hummingbird Cake batter in the springform pan and bake at 300 degrees F for 1 hour and 15 minutes. Cool completely in the pan before removing it to a serving plate. Garnish with chocolate ganache and toasted pecans if desired.

Chocolate Ganache

Melt together in a double boiler:

  • 1 cup chocolate chips 
  • ¼ cup whipping cream

Saturday, 20 December 2008

Mediterranean Chicken Wellington

Mediterranean Chicken Wellington

Today we have a great recipe for dinner entertaining that is particularly good for the holiday season because it can be prepared well in advance and just popped into the oven for about 45 minutes before serving. Serve it with a simple rice or pasta side dish and you've got a very impressive meal to serve your guests that doesn't have you stuck in the kitchen while everyone else is enjoying the merriment.


1 pkg. (2 sheets) frozen puff pastry, thawed
4 large boneless chicken breasts
4 ounces feta cheese
¼ cup chopped sun-dried tomatoes
2 tbsp fresh oregano (or 2 tsp dried oregano)
½ cup chopped, pitted kalamata olives
Salt and pepper to season
1 egg
2 tbsp cold water

Butterfly the chicken breasts by laying them flat on a cutting board and using a sharp knife, cut half way through the meat horizontally, stopping at about ½ inch from the edge and before you cut them completely in half. Fold the breasts open and season with salt and pepper. Share the feta, olives, oregano and sun-dried tomatoes evenly among the 4 breasts and fold the other half of the breasts back over the filling.

Cut the puff pastry sheets in half and wrap a stuffed chicken breast in each piece. Brush all the edges of the pastry with an egg wash of 1 egg whisked together with 2 tbsp cold water. Brush the egg wash over the tops of the pastries as well and place them on a parchment paper lined baking sheet and bake at 375 degrees for about 45 minutes until the pastries are a medium golden brown and the internal temperature has reached 180 degrees F on a meat thermometer. Let stand for about 10 minutes before serving.

Thursday, 18 December 2008

Blackberry White Chocolate Galette

I had to get a dessert together quickly for an impromptu dinner with my visiting sister from Alberta this week and decided on this very quick and easy dessert. I think it will probably make a great holiday entertaining recipe for all those inevitable occasions when you don't have a lot of time to throw together a dinner on short notice. Substitute your favourite fresh berries or other fruits for a myriad of variations.

Serves 6
1 sheet frozen puff pastry, thawed
1 pint whipped cream
8 oz white chocolate chips
1 tsp vanilla extract
1 pint blackberries
2 tbsp finely grated lemon zest

Fold ½ inch of the edge of the puff pastry toward the center all around the outer edge of the puff pastry. Place on a parchment paper lined baking sheet and use a fork to poke holes in the dough in about a dozen places over the surface of the dough. Bake at 350 degrees F for about 20 minutes or until golden brown. Make sure the bottom of the pastry had browned sufficiently before removing it from the oven to cool completely on a wire rack.

Melt the chocolate chips in a double boiler and set aside to cool almost to room temperature.
Meanwhile, whip the whipping cream and vanilla to firm peaks. Fold the melted white chocolate gently into the whipped cream and spoon the mixture over the pastry. Place the berries over the top and sprinkle the galette with the lemon zest.

Saturday, 13 December 2008

Sundried Tomato Bacon Burgers

Sundried Tomato Bacon Burgers
Sometimes nothing beats a good burger. My burger cravings are never going to be satisfied by the lack luster offerings of all of the fast food chains. For the most part, I am a big burger purist, preferring to make my own very simple hamburgers. I'm not fond of homemade burgers with loads of fillers; I prefer an all beef burger to be enjoyed purely on the virtues of the flavour of the beef. Most often salt and pepper are the only additions to my hamburger patties.

My burger purist sensibilities are in no way offended by this recipe however. This sort of Italian version of a burger is absolutely delicious and the flavours of garlic, oregano, tomato and parmesan go very well with the flavour of the beef. I sometimes make these with a couple of ounces of mozzarella or cheddar tucked into the center of the burgers to make a sort of inside out cheeseburger. Mozza and marinara sauce also make very good additions to these great burgers.

Makes 4-6 burgers

2 ½ pounds extra lean ground beef
1 tsp oregano
¼ cup fresh grated parmesan
¼ cup finely chopped sundried tomatoes
1 clove finely minced garlic
½ tsp kosher salt
½ tsp freshly ground black pepper

Mix all ingredients together thoroughly and form into 4-6 burger patties. Grill or pan fry as desired. Serve on large Kaiser buns with your favourite burger toppings.

Wednesday, 10 December 2008

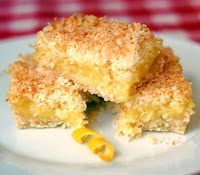
Lemon Coconut Crumble Bars


For over 150 more tried and tested cookie recipes be sure to browse our 

Lemon Coconut Crumble Bars
This is a very old family recipe of mine but I have often seen them in local bakeries across Newfoundland. I have often seen versions without the coconut but we always had them with coconut in our family. Many people use a packaged lemon pie filling in their versions but I like to make my own from scratch. This recipe works well with other citrus fruits like orange and lime as well.


Lemon Coconut Crumble Bars

Recipe by Barry C. Parsons
Lemon Coconut Crumble Bars - a 35+ year old family recipe that combines coconut and tangy lemon filling in a buttery crumble bar cookie. Freezes quite well too.
Prep time: 30 minutes
Cook time: 45 minutes
Total time: 1 hour 15 minutes
Yield: About 36 bar cookies
Ingredients
  • 2 cups flour
  • 3/4 cup sugar
  • 1 tsp baking powder
  • 2 cups dried coconut, medium cut
  • pinch salt
  • 1 cup butter, cut in small pieces
  • FOR THE LEMON FILLING
  • 1/3 cup cake flour
  • 1/3 cup corn starch
  • 1 1/2 cups sugar
  • 5 egg yolks, slightly beaten
  • Zest of 2 large (or 3 small) lemons, very finely chopped
  • Juice of 2 large (or 3 small) lemons
  • 2 cups water
  • 3 tbsp butter
  • pinch salt
Lemon Coconut Crumble BarsDirections
  1. TO MAKE THE LEMON FILLING combine the corn starch, salt, cake flour, sugar and water in a medium saucepan.
  2. Cook over medium-low heat until the mixture thickens, stirring constantly. Remove from heat.
  3. Pour about 1/2 cup of the thickened mixture over the beaten egg yolks and whisk together quickly. This tempers the egg yolks so that they do not scramble.
  4. Pour this mixture back into the pot and whisk it in quickly. Return the pot to the heat and stir constantly for a few minutes until the mixture is thick and evenly smooth.
  5. Whisk in the lemon juice and zest and remove from the heat.
  6. Finally whisk in the butter and set aside to cool while you prepare the crumble mixture.
  7. FOR THE CRUMBLE sift together the flour, sugar, baking powder, coconut and salt.
  8. Using your hands or a pastry blender cut in the butter until the it is completely incorporated into the dry ingredients.
  9. Press half of the crumb mixture into the bottom of a 9 x 13 inch well greased baking pan. Pour the lemon filling evenly over the bottom crumbs. Gently sprinkle the remaining crumbs over the lemon filling and press down gently.
  10. Bake in a 350 degree F oven for 40 - 45 minutes or until light golden brown in color. Cool completely in the pan before cutting into squares and serving.

Monday, 8 December 2008

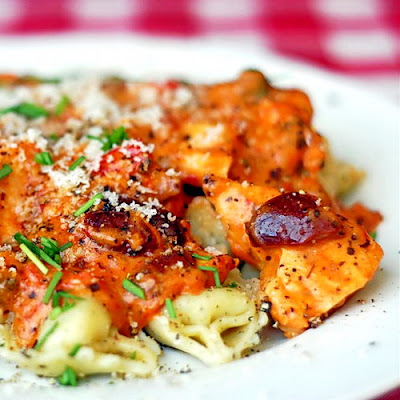
Tortellini with Chicken in Spicy Blush Puttanesca Sauce

Tortellini with Chicken in Spicy Blush Puttanesca Sauce

This is another great work week recipe to serve on busy days when you can really use a 30 minute meal idea. For flavour, I'd stack this recipe up against any dish you'd spend hours slaving over. Very satisfying!

Serves 4

Boil for 12-14 minutes in a large pot of salted water:

1 large package of fresh cheese stuffed tortellini

Season with salt and pepper
4 boneless skinless chicken breasts

Grill the chicken breasts until fully cooked and cut in cubes.

For the sauce:
3 tbsp extra virgin olive oil
6 medium tomatoes, diced
3 cloves garlic minced
1 teaspoon brown sugar
1 medium red onion diced
½ cup chopped fresh basil
2/3 cup pitted kalamata olives
1 roasted red pepper diced
½ tsp chilli flakes or 2 tbsp hot sauce (optional)
3 tbsp chopped capers (optional)
Salt and pepper to season
1 teaspoon anchovy paste (optional)
½ cup whipping cream
Freshly grated Parmesan cheese

Meanwhile, in a large sauté pan, heat the olive oil over medium heat. Add the garlic and onions and sauté for about a minute. Add the olives, tomatoes, brown sugar, chilli flakes, anchovy paste and capers and cook until the tomatoes just start to break down. Add the red pepper and basil and cook for an additional minute. Season the sauce with salt and pepper to taste. If the sauce is too thick you can add a little of the pasta water to thin it down. Add the whipping cream and simmer for an additional minute.

Toss the sauce with the pasta and chicken and serve with freshly grated or shaved parmesan cheese.

Saturday, 6 December 2008

Chocolate Dipped Gingerbread Biscotti

Chocolate Dipped Gingerbread Biscotti
The holiday season baking is well upon us now and this recipe offers up a great treat for this time of the year. We have often chocolate dipped our gingerbread cookies in the past, so when I heard that a friend's chef husband was making gingerbread biscotti, I thought this was a good reason to step that idea up a notch. These store very well and make a great idea for gift giving too, wrapped in cellophane bags tied with a bright ribbon. These crunchy cookies meant for dunking in anything from cocoa to cappuccino would be a tasty and welcome gift for sure.

1/2 cup sugar
1/2 cup butter
1/2 cup dark molasses
1/4 cup cold water
2 1/2 cups flour
3/4 tsp salt
1/2 tsp baking soda
2 tsp powdered ginger
1/2 tsp cloves
1/2 tsp allspice

Cream the butter and sugar well. Blend in molasses and water.
Sift together remaining ingredients and blend together until dough forms.
Chill 2 to 3 hours.

Form the dough into two 3 inch wide logs and place 6 inches apart on a parchment lined cookie sheet. Bake for about 30 minutes at 350 degrees F. Remove the biscotti from the oven and let cool for about 5 minutes before cutting the biscotti on a diagonal into ¾ of an inch thick slices.

Place the biscotti back on the parchment lined cookie sheet and reduce the temperature to 300 degrees F. Bake for an additional 15 minutes before turning the cookies over and baking for an additional 10 minutes. Cool completely.

Melt 12 ounces of dark chocolate chips in a double boiler. Dip one side of the biscotti into the chocolate and let stand until the chocolate cools and hardens.

Tuesday, 2 December 2008

Newfoundland Cod with Olives and Sundried Tomatoes en Papillote


First things first; don't be intimidated by the name of this recipe..."en papillote" simply means cooked in parchment paper. It is a much under-used cooking method that should really be every busy family cook's best friend. It is a great simple way to steam fish and vegetables inside a paper pouch for one fast, healthy, simple, delicious, convenient and easy meal. I sometimes put mine together the night before when the next day is going to be a blur of work, school and driving kids to their evening activities. Nobody reading can relate, I'm sure! ;)

When prepared in just a few minutes the previous night, we can easily have these on the table in half an hour straight out of the fridge and into the oven. Now what are you going to do with the time you would have spent cooking?


Serves 4

4 six ounce fresh cod portions
¼ cup chopped sundried tomatoes
½ cup pitted kalamata olives
1 tbsp dried summer savoury (tarragon or dill make good substitutes)
2 tbsp extra virgin olive oil
4 medium red potatoes, washed and thinly sliced
Salt and pepper to season
Lemon for garnish

Begin by washing and slicing your potatoes and thinly slicing them. Add the slices to boiling salted water for 2 minutes to blanch them. Toss the blanched potatoes in the olive oil and savoury, and season them with salt and pepper. Divide the slices into 4 equal portions and arrange them in the centers of 4 large squares of parchment paper.

Season the fish with salt and pepper and place the cod portions on top of the potatoes. Top the cod with the sundried tomatoes and olives and a small drizzle of olive oil.

Bring two edges of the parchment paper together and roll the paper until one inch from the top of the fish. Fold the ends under the bottom to create a sort of sealed pouch in which the fish and potatoes can cook. Place on a baking sheet and place in a 375 degree oven for about 20 minutes. Cooking times will vary depending on the thickness of your cod portions. You may want to add another 5 minutes if they are particularly thick. Let the pouches rest for 5 minutes before serving.


Serve in the paper pouches with a lemon wedge to squeeze over the top of the fish.

This Old Gingerbread House

I got a call from a New York City writer for the "This Old House" website a week or so ago asking permission to use a photo of one of my gingerbread houses in a feature article on their site in December. I was happy to be included in what they considered to be the best gingerbread houses on the web and even more pleased that they chose to use my photograph for their home page this month. Check it out here:

http://www.thisoldhouse.com/toh/

Friday, 28 November 2008

French Onion Soup

I was feeling a little under the weather earlier this week and my appetite ran away from home for a couple of days. When I finally started to come around, I was in dire need of a little comfort food so Spouse whipped me up my favorite soup. This simple dish is a great example of how simple, quality ingredients can transform into something far greater than the sum of its parts. The key in such dishes is to be uncompromising in the quality of what goes into them.

Although I love French Onion Soup, I rarely order it except in very good restaurants. It appears on the menus of many mid priced eateries but most often bears no resemblance to a properly executed version of this soup. Good beef stock is essential; either make your own or purchase the best quality available. Fresh herbs make a big difference, as does the quality of the red wine. Use some good crusty bread for the the toasted croutons; the exceptional Belgian loaf from Georgestown Bakery, an artisan bread bakery in my neighbourhood is the perfect choice in this neck of the woods. Finally the cheese should also be the best quality you can afford. Some restaurants pile on great gobs of cheap commercial mozzarella when a smaller amount of a quality cheese would be much better. Gruyere is traditionally used but I like smoked Gouda as well and I do like to blend in a little mozza myself, just because I like the texture it adds.

It may be a 70's and 80's restaurant menu cliché item to many but once you've tasted a really well prepared version, I promise it will move from cliché to classic in a single bowl. This one breathed life back into my beleaguered belly this week.


Serves 3 - 4

2 tbsp extra virgin olive oil
2 tbsp butter
1 quart/liter low sodium beef stock
1 cup red wine
1 medium Spanish onion
1 large red onion
2 cloves garlic, minced
½ tsp ground thyme (or 2 teaspoons chopped fresh thyme)
½ tsp fresh ground nutmeg
Salt and pepper to season
4 slices crusty French bread, toasted and cubed.
1 cup shredded smoked Gouda or Gruyere cheese
½ cup shredded mozzarella

Heat the butter and olive oil over medium heat in a sauté pan and add the garlic and onions. Cook until the onions soften.

Meanwhile boil the beef stock until the volume has reduced by about ¼ , then add the red wine, sautéed onions and garlic, thyme, and salt and pepper to season. Simmer for another 5 to 10 minutes.

Ladle the soup into 4 medium oven-safe bowls, top with the toasted bread and then the grated cheese. Place under the broiler for just a couple of minutes until the cheese melts and is slightly browned. Serve.

Thursday, 27 November 2008

A Gower Street Christmas Construction Slideshow


: 


For a look at the comprehensive instructions for my method of constructing gingerbread houses please check out this link
http://rockrecipes.blogspot.com/2008/11/detailed-instructions-for-making.html


Thanks for all the great email feedback from the photos I posted of this year's gingerbread house project. Many readers asked if there would be a construction slideshow this year as well and I've finally found a little time to throw a simple one together.

I'm re-posting the links to my previous gingerbread house posts for readers who may not have seen them yet and for those who requested them to be posted with the construction video.

http://rockrecipes.blogspot.com/2008/11/gower-street-christmas.html

http://rockrecipes.blogspot.com/2007/11/another-circular-road-christmas.html

http://rockrecipes.blogspot.com/2008/11/original-circular-road-christmas.html

http://rockrecipes.blogspot.com/2007/11/another-circular-road-christmas_29.html


Wednesday, 26 November 2008

Chocolate Orange Muffins

I was up early this morning in time to make these deadly chocolate orange muffins for breakfast. The wife and kids will follow their noses downstairs this morning for sure.
Sift together:

2 ½ cups flour
¾ cup sugar
½ tsp salt
4 tsp baking powder

Set aside.

Whisk together

2 eggs
1 cup milk
1/2 cup cooking oil
Zest of one orange, finely grated
1 tsp vanilla extract

Blend in the dry ingredients, just until the dry ingredients are incorporated into the batter; do not over mix. Fold in:

¾ cup dark chocolate chips

Spoon batter into 12 well greased muffin tins. Bake for 15 minutes at 400 degrees F, then reduce the heat to 350 degrees F and bake for an additional 10 minutes or until a toothpick inserted in the center comes out clean.

Saturday, 22 November 2008

A Gower Street Christmas


A great slideshow of the construction of this year's house can be seen by clicking on the link below:

Lighted and Decorated Gingerbread House, St. John's, Newfoundland
Lighted and Decorated Gingerbread House, Gower St. in St. John's, Newfoundland

After two years on Circular Road, our gingerbread project moves a little closer to the harbour, this year landing on the east end of Gower Street to feature these three traditionally colorful row houses.


For the sixth year now, this gingerbread creation was raffled off as a fundraiser to benefit Bishop Feild School in downtown St. John's, Newfoundland.

If you are interested in photos of our other annual gingerbread house projects or would like detailed instructions on how to build your own gingerbread house, you can find them here:

http://rockrecipes.blogspot.com/2008/11/detailed-instructions-for-making.html


Friday, 21 November 2008

Pineapple Ginger Salsa


Shown here with herb roasted pork tenderloin on a bed of basmati rice, this is a very versatile salsa that goes well with grilled chicken or fish. We also serve it with pan fried cod or on it's own with baked corn tortillas for a healthy party snack. Using fresh golden pineapple is essential to the sucess of this salsa; canned just won't cut it here!

Makes about 2 cups.

1 ½ cups fresh pineapple, diced small
1 clove minced garlic
2 tbsp fresh grated ginger
Juice of one lemon
1 tbsp lemon zest, finely chopped
½ red onion diced
2 green onions chopped
1 tbsp finely chopped jalapeño pepper
1 tsp salt
½ tsp coarse ground black pepper
1 tsp ground cumin
1 tbsp brown sugar
¼ cup chopped fresh cilantro
½ red pepper diced small

Toss all ingredients together well in a glass bowl. Let stand for about 2 hours before serving, stirring occasionally.

Wednesday, 19 November 2008

Strawberry Chocolate Truffle Tuxedo Tarts


Strawberry Chocolate Truffle Tuxedo Tarts

Thanks to Janette who suggested a garnish of White Chocolate Whipped Cream to my Strawberry Chocolate Truffle Tarte; it inspired this little invention. I previewed these photos over on the Rock Recipes Facebook group as I often do with completed recipes that I haven't gotten around to actually writing yet, and I got so many message responses from it that I decided to post it here right away. Really, it is just a variation on the Strawberry Chocolate Truffle Tart that was posted a couple of weeks back. Find that recipe here: http://nlrockrecipes.com/2008/11/strawberry-chocolate-truffle-tarte.html

These do present nicely as individual tarts which are a great idea for the upcoming holiday entertaining season. I made them in 4 inch individual tart pans but they could easily be made in muffin tins if you don't have such pans. The baking time has to be adjusted of course; I found that these tarts only took 15 minutes in the oven after baking the pastry shells. I'd estimate about 10 minutes if baked in muffin tins.

The addition to these tarts is a white chocolate flavoured whipped cream that I piped on top to envelop a fresh, ripe strawberry, the recipe for which follows.

Strawberry Chocolate Truffle Tuxedo Tarts


White Chocolate Whipped Cream

Scald to almost boiling in the microwave

1/4 cup whipping cream

Pour immediately over

3/4 cup white chocolate chips

Let stand for five minutes to allow the chocolate to melt, then stir until smooth. Cool to room temperature.

Meanwhile, beat to firm peaks

1 cup whipping cream
2 tbsp icing sugar (powdered sugar)
1 tsp vanilla extract

Whisk in the white chocolate mixture in three equal portions until well incorporated. Chill for an hour or two before piping the cream on top of the tarts. Store in the refrigerator.
Makes a very nice garnish for many other desserts as well.

Monday, 17 November 2008

Chicken Chorizo Lasagna

Chicken Chorizo Lasagna
This recipe comes courtesy of Spouse (who I'm told by my 9 year old, doesn't get enough credit for her part in contributing to this blog). Spouse is an excellent cook in her own right and kitchen collaborations are a rule rather than an exception at our house. There are few collaborations in the clean-up department though, as my participation in tidying up the considerable mess I can inflict on a kitchen is rather lacking. She gets full credit for that part of the process! ;)

It was her idea to add chorizo to a lasagna recipe and this one is the result. I love chorizo sausage and it does add great flavor to this delicious lasagna. You can use either fresh chorizo or finely chopped cured chorizo. Other spicy sausage can also be substituted too. (You can also very easily make your own just click here for our easy homemade Chorizo Sausage recipe.) Sometimes like in the photo above, we even use leftover diced grilled chicken instead of ground chicken which I actually prefer.

You can use store bought lasagna noodles (fresh if possible) or make your own from the recipe provided below. If using dry lasagna noodles, I par boil them for 5 minutes before assembling the dish.

Homemade Pasta

4 cups durum semolina
2 cup all purpose flour
8 large eggs, room temperature

Combine flour and durum semolina and make a well in the center. Crack your eggs into the well and using a fork to beat the eggs, slowly begin to incorporate the flour into the eggs until everything is combined into a very stiff dough. You may add a little water to incorporate the dry ingredients if necessary but be careful not to make your dough too loose; it should still be quite a dense dough. Add a little extra flour if the dough is too sticky. The dough should be slightly stiffer than play dough.

Chicken Chorizo LasagnaKnead for 5 -10 minutes on a bread board, cover in plastic wrap and allow to rest for 20 minutes , then knead again and allow to rest again.You can use a pasta machine to roll the dough into sheets about 1/8 inch thickness or just a regular rolling pin on a well floured surface.

Boil pasta sheets for 1-2 minutes in salted water before using in the lasagna assembly.

For the sauce:
In a large saucepan sauté for 1 minute:

3 tbsp olive oil
4 cloves minced garlic

Add:

1 ½ pounds ground chicken (or pork or beef if you prefer)
½ pound chorizo sausage
1 small red onion finely diced

Cook until the meat has slightly browned. Add:

2 large cans (32 oz can) crushed roma tomatoes
½ bunch fresh basil
1 tbsp ground or crushed fennel seed
1 tbsp oregano
1 whole bay leaf
1 large carrot finely grated
½ cup finely diced celery
2 tbsp brown sugar
Salt and pepper to season
½ tsp chili flakes (optional)

Slowly simmer for about 30-40 minutes or until the sauce thickens, stirring occasionally. Remove bay leaf.

Ricotta Filling:
16 oz tub ricotta cheese
1 beaten egg
¼ tsp salt
¼ tsp pepper
¼ tsp freshly grated nutmeg
½ cup freshly grated Parmesan cheese

Mix together well.

Start constructing the lasagna by adding a cup of sauce to the bottom of a large lasagna pan. Add a layer of pasta, half the remaining sauce, another layer of pasta, then the ricotta filling, another layer of pasta and the remaining sauce. Top with a final layer of pasta and

1 pound grated part skim mozzarella cheese

Bake at 350 degrees for about an hour depending on the size of your lasagna pan. Let stand for 15- 20 minutes before cutting and serving.

Chicken Chorizo Lasagna

Friday, 14 November 2008

The Original Circular Road Christmas

So many readers emailed about the last gingerbread house slideshow that I decided to upload a slideshow from our 2006 project. Have a look!

I'm still working on this year's "Gower Street Christmas" and hope to finish it on the weekend.


Thursday, 13 November 2008

Grilled Sausage Spaghetti Puttanesca


Everyone needs a quick supper idea from time to time and one of my favourites is this particular pasta dish. A puttanesca sauce is very quick and easy to make with some great flavours melding together in it. You may prefer to leave out the anchovy paste or capers if you dislike them and still have a very tasty dish. This one is paticularly fast to put together if you have leftover sausages from the grill to work with; I can have mine on the table in 20 minutes! Grilled fish or chicken also go well with this sauce.


Serves 4

6 large spicy Italian sausages, grilled and sliced
6 medium tomatoes, diced
3 cloves garlic minced
3 tbsp extra virgin olive oil
1 medium red onion diced
12 ounce package dry spaghetti
½ cup chopped fresh basil
2/3 cup pitted kalamata olives
1 red pepper diced
½ tsp chilli flakes or 2 tbsp hot sauce (optional)
3 tbsp chopped capers (optional)
Salt and pepper to season
1 teaspoon anchovy paste ( optional)
Parmesan cheese

Boil the pasta in well salted water for about 8 minutes or until al dente.
Grill sausages until completely cooked. Slice.

Meanwhile, in a large sauté pan, heat the olive oil over medium heat. Add the garlic and onions and sauté for about a minute. Add the olives, tomatoes, chilli flakes, anchovy paste and capers and cook until the tomatoes just start to break down. Add the red pepper and basil and cook for an additional minute. You can add the sausage to the sauce at this point if you prefer, or just serve it on top of the finished pasta. Season the sauce with salt and pepper to taste. If the sauce is too thick you can add a little of the pasta water to thin it down.

Toss the sauce with the pasta and serve with freshly grated or shaved parmesan cheese.

Tuesday, 11 November 2008

Roasted Tomato Jam and Goat Cheese Bruschetta with Balsamic Reduction

Roasted Tomato Jam and Goat Cheese Bruschetta with Balsamic Reduction
This is one of my all time favourite appetizers or hors d'ouevres or even as a great simple lunch. It is so good, because it relies on simple, highly flavourful ingredients that compliment each other very well. This is a particular favorite recipe when the summer tomatoes are at their best when we serve it often. Spouse, in particular, really loves these Bruschetta.


6 medium vine ripened tomatoes diced
2 cloves minced garlic
4 tablespoons extra virgin olive oil
½ teaspoon kosher salt
½ teaspoon freshly ground black pepper
1 teaspoon brown sugar

Toss together in a shallow baking dish and bake at 350 degrees F for about an hour stirring occasionally until most of the liquid has reduced off the tomatoes are the consistency of jam.

Toast small slices of baguette and warm the goat cheese in a 300 degree oven. (Do not try to warm goat cheese in the microwave.) You can spread the goat cheese on the toasted baguette and top with a little of the tomato jam or just present the jam, goat cheese and toasts separately on a serving platter or individual plates as an appetizer and let your guests assemble the Bruschetta themselves.

In a very small saucepan boil ¼ cup of balsamic vinegar until it reduces and begins to thicken to a syrupy consistency. Drizzle the balsamic reduction over the Bruschetta.

Thursday, 6 November 2008

Curry Radicchio Chicken Salad Sandwiches

The busy work and school week, combined with extensive chauffeur duties to our kid's activities, leaves us with a tight schedule to fit an evening meal on many occasions. One solution is to have a quick meal in the fridge that is on the table in a couple of minutes. These Curry Radicchio Chicken Salad Sandwiches fit that bill nicely; we served these with the cold Lemon Spaghetti Salad that was featured earlier this week on this blog. The Chicken Salad and pasta salad can easily be prepared quickly the evening before. I plan to have a grilled chicken dish the day before and grill extra chicken breasts to make these sandwiches for lunch or dinner the next day. Sometimes, even I am forced to be organized!

We served these particular sandwiches on some toasted fresh rolls from Manna bakery here in St. John's.

4 mini baguettes or Kaiser rolls
4 grilled chicken breasts, cubed
8 slices crisp cooked bacon
1 cup shredded radicchio
½ cup lemon mayonnaise
3 tbsp finely chopped red onion
1 ½ tbsp curry powder
3 tbsp chopped fresh mint
1 tbsp brown sugar
1 tbsp finely grated lemon zest
Salt and pepper to season

Toss together the cubed chicken, radicchio, mayo, red onion, curry powder, mint, salt and pepper. Serve on the toasted rolls and top with the crisp cooked bacon. Serves 4.

Tuesday, 4 November 2008

Strawberry Chocolate Truffle Tarte

Strawberry Chocolate Truffle Tarte
This is an idea that I had based upon my Tarte au Chocolat recipe. When I make Chocolate Dipped Strawberries I usually use chocolate ganache instead of plain melted chocolate because it melts in your mouth faster making the flavours combine better. So... a chocolate truffle tarte with strawberries on top seemed like a natural. It was well appreciated by the in-laws who came for Sunday supper this weekend. The leftovers were divided between three friends who were lucky enough to find a surprise on their doorsteps yesterday.

Strawberry Chocolate Truffle Tarte
A word about the chocolate for this recipe before you begin. Good quality chocolate is essential for this recipe. I use chocolate that has an absolute minimum of 50 % cocoa. I think darker is better but tastes vary.

For the pastry:
½ cup butter, cut in small pieces
1 cup + 1 tbsp flour
¼ tsp salt
1/3 cup sugar
¼ cup cocoa
1 large egg, slightly beaten
1 tsp vanilla extract

Sift together flour, sugar, cocoa and salt. Cut in butter with a pastry blender or two knives, leaving small peas sized pieces of butter throughout the mixture. Add egg and vanilla and mix together only enough to make a dough form. Wrap the dough in plastic wrap and let it rest in the refrigerator for a half hour before rolling out.

You can make your dough the previous day but make sure you take it out of the fridge for 10 minutes to warm slightly before rolling out.

Roll the dough into a 12 inch round and place in the bottom of a 9 inch tarte pan or pie plate. You will need to blind bake this crust for 10 minutes at 350 degrees F before adding the filling. Blind baking is essential so that the bottom crust will not get soggy. Let the dough hang a half inch past the rim of the pan to allow for shrinkage as the pastry shell bakes. Any excess can be trimmed off when the shell is still hot out of the oven.

To blind bake a crust, simply place a piece of parchment paper or aluminum foil over the dough and cover the bottom of the pie plate with baking weights. (Marbles, dry beans, peas, rice or barley work just as well as anything else.)

For the chocolate filling:

7 ounces (by weight) dark chocolate, chopped into small pieces
7 ounces whipping cream
3 ounces milk
1 tsp vanilla
1 large beaten egg

Bring the cream and milk just to boiling and pour the hot liquid over the chopped chocolate. Let stand for 5 minutes and whisk together until smooth. Cool for about 10 minutes before whisking in the beaten egg and vanilla.

Pour into the blind baked shell and bake at 350 degrees for about 20 minutes. The center can still be a little wobbly at this point. The surface should still be shiny. Cool thoroughly before topping with fresh strawberries. Garnish with a drizzle of melted chocolate if desired.

Sunday, 2 November 2008

Lemon Spaghetti Salad

This is a simple but versatile recipe for a tasty side dish. We serve this one hot or as pictured here, as a cold pasta salad. It's a great pot luck or picnic dish as well.

1 pound package of dry spaghetti
½ cup extra virgin olive oil
¾ cup freshly grated parmesan cheese
Juice of 3 lemons
Zest of one lemon, finely grated and minced
¼ cup chopped fresh mint (fresh tarragon or basil make good substitutes)
Salt and pepper to season
½ cup chopped green onions

Boil the spaghetti to al dente in salted water. Drain the spaghetti. Whisk together the remaining ingredients to make the dressing, and then toss together with the cooked spaghetti and serve hot or cold.

Friday, 31 October 2008

Lime Chicken Chimichangas with Lime Guacamole

Lime Chicken Chimichangas with Lime Guacamole
Here's a recipe that has been a family favorite at our house for years.

Makes 6
3 boneless skinless chicken breasts cut in strips
3 tbsp olive oil
2 cloves finely chopped garlic
1 small red onion, chopped
1 red pepper cut in thin strips
1 tsp cumin
1 tbsp chilli powder
Zest of one lime, finely grated
Juice of one lime
½ jalapeño pepper, finely minced (optional or adjust to taste)
Salt and pepper to season
8 ounces of Monterey Jack cheese, cut in 6 , four inch strips
6 large 10 inch flour tortillas
Canola oil for deep frying

Heat olive oil in a non-stick skillet over medium heat. Season chicken breast strips with salt and pepper and sauté for about 3 minutes along with the red onion and garlic. Increase the heat to medium high and the lime juice and zest, spices and chopped jalapeño. Sauté this until almost all of the juice has been reduced off , then set aside to cool a little.

Place the cheese strips in the center of the tortillas, add some red pepper strips and then the sautéed chicken mixture. Bring two opposite sides of the tortilla toward the center, they don’t need to meet. Begin rolling from one of the ends, making sure that the seam is on the bottom of the chimichanga.

Heat oil to 325 degrees F in a deep fryer and place the chimichangas seam side down in the basket. Lower into the hot oil and fry until golden brown. Serve with salsa, sour cream and Lime Guacamole.

Wednesday, 29 October 2008

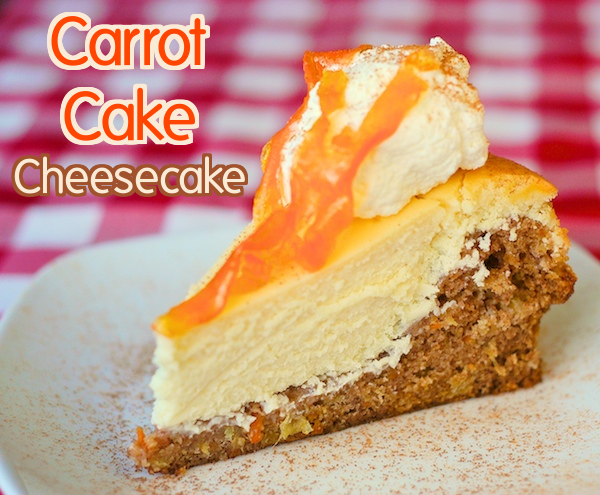
Carrot Cake Cheesecake

Carrot Cake Cheesecake
Inspired by The Cheesecake Factory version of this fabulous dessert which I've never had before but as a lover of cheesecake and carrot cake, I was seriously intrigued by the idea and couldn't wait to try a version using my own favorite carrot cake and cheesecake recipes. It turned out great the first time and those who tried it this past weekend raved about it.

When you think about it, we always have cream cheese frosting on carrot cake, so the combination of cheesecake and carrot cake is a natural. If you like carrot cake and LOVE cheesecake, meet you new best friend!

Carrot Cake Layer

Grease and flour the bottom of a 9 or 10 inch spring form pan. Do NOT grease the sides.

  • 1 ½ cups flour
  • ¾ teaspoon baking powder
  • ¾ teaspoon baking soda
  • 1 ½ teaspoons cinnamon
  • 1/2 teaspoon freshly grated nutmeg
  • 1/2 teaspoon salt
  • 1 cup sugar
  • 2/3 cup vegetable oil
  • 2 eggs lightly beaten
  • 1 cups grated carrots
  • 1 cup drained crushed pineapple
  • ¼ cup chopped pecans (optional)

Preheat oven to 300 degrees F
Sift together flour, baking powder, baking soda, cinnamon, nutmeg and salt.
In a large mixing bowl, beat the sugar, eggs and oil until light and fluffy.
Stir in the grated carrots, pineapple and nuts.
Fold in the dry ingredients by hand.
Stir only until the dry ingredients are incorporated into the batter. Do not over mix.
Pour into prepared pan.

Cheesecake Layer

Cream together:
  • 2 eight ounce packages ounces cream cheese
  • 2/3 cup sugar
Add, one at a time
  • 2 eggs
beating well after each addition. Add
  • 2 tsp vanilla extract
Finally blend in:
  • ¼ cup whipping cream
Spoon this cheesecake batter slowly and evenly over the cheesecake batter already in the spring form pan. Bake at 300 degrees F for 1 hour and 15 minutes for a 9 inch pan. A 10 inch pan may require a little less baking time. When the cheesecake just begins to turn brown at the edges is a good time to take it out of the oven. Cool on a wire rack for 5 minutes before running a sharp knife all the way around the inside edge of the cake. Leave on the wire rack until completely cooled, then refrigerate, remove from pan and garnish with whipped cream and if desired, candied carrot curls.

To make candied carrot curls use a vegetable peeler to cut long thin strips of carrot. Boil them gently for only a few minutes in a syrup made from 3/4 cup sugar and 2/3 cup water. Let them drain and cool on a wire rack before twisting them loosely into curls and using them to garnish the cheesecake.


Carrot Cake Cheesecake

Monday, 27 October 2008

Raspberry White Chocolate Torte


This is a bit of a simplified version of my Raspberry White Chocolate Truffle Tuxedo Cake previously featured on this blog. It uses only three of the elements of the more complicated dessert but is still very delicious while being a little easier and faster to prepare.


Chocolate Cake

1 cups sugar
1 cups all purpose flour
1/3 cup + 1 tablespoon cocoa
1 tsp. baking powder
½ tsp baking soda
¼ tsp salt
1 egg
½ cup soured milk
½ cup black coffee
¼ cup vegetable oil
1 tsp vanilla extract

Combine all ingredients in a mixing bowl and beat with electric mixer for 2 minutes.

Pour into a greased and floured 9 inch cake pan. Bake at 350 degrees F for 30-35 minutes or until toothpick inserted in the center comes out clean. Cool completely.
When the cake is completely cool, wrap a 4 inch wide, heavy duty aluminum foil collar around the cake to act as a mold, taping the end so that it fits snugly.
White Chocolate Truffle Filling

1 ½ cups white chocolate chips
1 ½ cups whipping cream
Scald ½ cup whipping cream almost to boiling. Pour over white chocolate chips and let stand for 3-4 minutes before stirring until smooth. Cool this mixture almost to room temperature before folding it gently into 1 cup whipping cream that has been beaten to stiff peaks. Pour inside the aluminum foil collar and chill for a couple of hours before adding the raspberry layer.

Raspberry Topping

2 cups fresh or frozen raspberries
½ cup sugar
1 tbsp corn starch dissolved in an ounce of cold water

Bring the raspberries and sugar to a very gentle boil for 5 minutes. Keep the stirring to an absolute minimum so as not to break up the raspberries too much. Slowly stir in the dissolved corn starch and cook for an additional minute. Remove from heat and cool to room temperature before spooning over the chilled white chocolate layer. Refrigerate for a couple of hours or overnight before serving.

Saturday, 25 October 2008

Scallop Bacon and Ricotta Cannelloni with Roasted Tomato Fennel Sauce

This definitely is my very favorite pasta dish! It combines so many of my favorite flavours and ingredients. Scallops are my favorite seafood and this roasted fennel and tomato sauce is a perfect accompaniment to the scallop, ricotta and bacon flavours. This is a great recipe for any special occasion dinner. I sometimes prepare the filling and sauce the day before and can then assemble the cannelloni quite quickly for a workday dinner. Absolutely delicious!

Serves 4
8 large ripe tomatoes diced
1 large fennel bulb diced
4 cloves chopped garlic
4 tbsp olive oil
2 tbsp brown sugar
Salt and pepper to season
2 tbsp basil

Toss all ingredients together in a shallow baking dish and bake at 375 degrees F until the fennel pieces are very soft and most of the liquid has cooked off. Puree in a food processor or blender and set the sauce aside.

1 package fresh lasagna pasta sheets, cut in half to make 12 cannelloni rollers

Melt 2 tbsp butter in a large skillet
Add 2 cloves minced garlic and cook for one minute
Toss in
1 to 1 ½ pound small scallops

Sauté the scallops in the garlic butter over high heat for only a couple of minutes and remove from the heat and let cool to almost room temperature.

Mix together:

1 sixteen ounce tub ricotta cheese
6 slices bacon, cut in small pieces and cooked crisp
½ tsp nutmeg
½ tsp salt
½ tsp black pepper

Add the sautéed scallops and stir well. Spoon a couple of heaping tablespoons of the filling onto each half sheet of pasta roll into a cylinder.

Spoon about 1/3 of the sauce into the bottom of a baking dish and lay the cannelloni in a single layer on top of the sauce. Cover with the remaining sauce and bake for about 30-40 minutes at 350 degrees F. Serve with some freshly grated Parmesan cheese.

Thursday, 23 October 2008

Cinnamon Apple Sour Cream Custard Flan


I combined a couple of my favorite recipes to come up with this fantastic dessert. This was the first time that I did a sauteed apple topping for my famous sour cream custard flan. I brought it to a house party a couple of weeks ago and it was a huge hit. Just looking at the picture this morning makes me want to bake another one. This one very quickly jumps to my top ten favorite desserts list. Highly recommended!


Grease a 9 inch springform pan.

Mix together until well combined:

2 ½ cups graham cracker crumbs
½ cup melted butter
¼ cup sugar

Press into the bottom and sides of the greased springform pan to about a ½ inch from the top of the pan.

For the custard part of this desert it is important to use full fat sour cream or the filling will not set. I use 18% milk fat sour cream that is sometimes sold as “restaurant style” or “extra thick”.

Whisk together until the sugar is dissolved:

Three, 8 oz tubs of sour cream
1 cup sugar
3 large eggs
3 tsp vanilla extract

Pour into the prepared graham crumb crust and bake at 350 degrees F for 50-60 minutes. The custard will still be quite jiggly when done and just beginning to brown slightly at the edges. Allow the flan to cool to room temperature then refrigerate for a couple of hours before serving with the sautéed apples on top.

Sautéed Apples

Peel and cut into thick slices

8 large apples

In a large skillet melt

1/3 cup butter

Add
1 ½ tsp cinnamon
¾ cup light brown sugar

Cook until the sugar dissolves and the mixture is bubbly. Add the apples and sauté until the apples are just fork tender but not mushy; they should still be semi-firm in texture. Remove from heat. The idea here is to let the residual heat to partly cook the apples. Drain the apples in a colander for about a half hour, collecting the juice and syrup that drains off.

Return the juice and syrup that has drained off the cooked apples to the sauté pan and simmer over medium heat until the sauce gets very thick. In a large bowl, gently toss this sauce with the cooked apples and spoon onto the top of the completely cooled flan.

Monday, 20 October 2008

Chocolate Raspberry Scones

Chocolate and raspberries...mmmm! I made these for Sunday brunch this past weekend. I may have them again this weekend!
I start these in my food processor because it is so fast but they can be made just as easily in a large bowl by cutting the butter in with a pastry blender or even 2 knifes held between the fingers.

In a food processor, combine:
3 cups flour
4 tsp baking powder
½ tsp salt

Cut in:
¾ cup very cold butter, cubed
Pulse process until this mixture resembles a coarse meal. It is very important that pea sized pieces of butter remain in this mixture. Remove to a large bowl and toss in:

1 cup raspberries, fresh or frozen
¾ cup chocolate chips
(Frozen raspberries actually work best here as they hold their shape better as the dough is formed.)

Mix together:

2 tbsp lemon juice
2 tsp vanilla extract
1 cup milk

Pour this over the surface of the dry mixture. Toss all together gently with a fork only enough to form a dough ball. It is important that you work this dough as little as possible or the finished scones will be too dense and heavy. Roll to 1 inch thickness and cut out scones with biscuit cutter or in triangles with a sharp knife and place on parchment lined baking sheet.

If desired you can brush the tops of the scones with an egg wash of 1 egg beaten together with 1 tbsp water. You can sprinkle the tops with turbinado sugar if desired but this is, of course, optional.
Bake at 375 degrees F for 25 minutes or until light golden brown. Baking time will vary depending on the size of your biscuit cutter. This recipe makes 12 scones.

Sunday, 19 October 2008

Tomato Fennel Braised Chicken Thighs

Tomato Fennel Braised Chicken Thighs
One of my very favorite flavor combinations is tomato and fennel. I love the flavor boost that fennel gives to a great tomato sauce and when you slowly braise chicken thighs in that sauce to tender deliciousness, it just gets even better.  We like to serve this over pasta or rice for one delicious slow cooked comfort food dinner.
  • 2-3 pounds boneless skinless chicken thighs
  • Salt and pepper to season chicken
  • Flour for dredging chicken
  • 4 tbsp olive oil
  • 2 cups chicken stock
  • 6 large ripe tomatoes, diced
  • ½ large bulb fennel (or one small bulb ), diced
  • 4 cloves minced garlic
  • 1 large red onion diced
  • 1 tbsp dried oregano
  • ½ tsp salt
  • ½ tsp freshly ground black pepper

Heat olive oil in a large skillet over medium heat. Season chicken thighs with salt and pepper and then dredge them in plain flour. Brown the chicken thighs on both sides. Deglaze the pan with the chicken stock, making sure to loosen any browned bits from the bottom of the pan.

In a covered roasting pan toss together the remaining ingredients. Add the browned chicken thighs on top of the vegetables and pour the chicken stock over everything. Cover and roast at 300 degrees F for about 90 minutes or until most of the liquid has cooked off and the chicken is tender and falling apart.

To serve, you can either spoon the vegetables over rice or pasta or, if you prefer, process them slightly in a foods processor to make a sauce.