Monday, 30 September 2013

Guest Post: Autumn Fruit Ginger Pudding by Gluten-Free SCD & Veggie


Today we're wrapping up The Seasonal REAL Food Blog Series with an awesome recipe from Vicky at Gluten Free SCD and Veggie.  I have been following Gluten Free SCD and Veggie for a while now.  It's a wonderful blog filled with yummy, gluten-free, SCD friendly and vegetarian recipes.    

Please make sure to visit Vicky's blog, and while you're there, make sure to check out: Ginger and Lemon Tart, Almond & Butternut Squash Bites, and Grain Free Lemon and Blueberry Cake. 

************ 

When Emily kindly asked me to be included in her Seasonal Real Food Blog Series, I felt so honoured as well as excited because not only have I admired Emily's blog for some time, Autumn is my favourite time of the year as far as cooking is concerned.  The colours of the Autumn foods can be so vibrant and the nutrients they possess are able to perk us all up for the colder months ahead.  I planned to post this recipe idea on my blog a couple of months ago so when Emily asked me to contribute a seasonal recipe, I knew this was perfect.   The pictures show this recipe made with pears but apples and pears together works beautifully and if you pop in some berries, the nutritional value of the pudding increases in leaps and bounds!  Ginger has exceptional healing properties and is well known for it's powers in aiding recovery of colds and flu making it an ideal choice as a spice in cooking at this time of year and it's so warming!


The recipe uses a variation of my Grain Free Plain Sponge Cake Recipe.  You will probably find you have too much cake but it was difficult to split the recipe.  I use one cake and freeze the other for another pudding. 


Autumn Fruit Ginger Pudding

  • 1 kg pears or apples, or a mixture of both (about 8) {Emily Note: About 2.2 lbs. for U.S. conversion}
  • ½ cup fresh orange juice (or more)
  • Honey to taste (optional)
  • 1 tsp cinnamon (optional)
  • 250 g ground almonds 
  • 3 large eggs
  • 3 tablespoons extra virgin olive oil {Emily Note: I bet this would be delicious w/ coconut oil or pasture butter too - if you use butter, you should use 4 tablespoons}
  • 80 ml organic honey 
  • 1 tablespoon pure vanilla extract (alcohol, water and vanilla only)
  • ½ teaspoon bicarbonate of soda/baking soda
  • 2 tablespoons ground ginger
  • Finely grated rind of 1 small lemon
  • Pinch salt

To make the cake :
  • Set the oven to 170° C {Emily Note: 338° F for U.S. conversion} then line two 7" sandwich cake tins tins with baking parchment or use 6" square tins. 
  • Pour the honey, extra virgin olive oil and vanilla extract into the bowl of a food processor then break in the eggs. Process until combined.
  • Measure out the ground almonds, lemon rind, ground ginger, bicarbonate of soda and salt into another bowl and whisk together with a fork or balloon whisk
  • Add the dry ingredients to the wet ingredients little by little processing on a medium speed until all the dry ingredients have been mixed in.
  • Share the batter between the tins then bake for 20 to 25 minutes in the bottom half of the oven or until a skewer inserted into the cake comes out clean and the top is springy to touch.
  • Allow to cool in the tins for 10 minutes before turning out onto a rack to cool further.
  • Place on a board and cut into 1" cubes.
To make the fruit filling :
  • Peel and slice the fruit. 
  • Tip into a pan with the fresh orange juice and cinnamon.
  • Bring slowly to the boil then turn down the heat ans simmer for about 20 minutes or until the fruit is soft adding additional orange juice as required.
  • Sweeten with honey to taste. 
When the fruit is cooked, tip into a serving dish and top with the cubes of cake.  Serve with your choice of cream.  I made some Vanilla Cashew Cream to serve with this pudding.


{Serves 4-6 people}


Vicky and her family are all vegetarians and live in the North of England.  She started to write her blog, Gluten Free SCD and Veggie, about two and a half years ago having been persuaded by her youngest son to write down the recipes she makes for him.  Her son follows the Specific Carbohydrate Diet which has kept him healthy and symptom free from Crohn's Disease for well over seven years now.  Connect with Vicky on FacebookPinterest and Twitter.


Sunday, 29 September 2013

VIDEO RECIPE: The Best Beef and Broccoli

The Best Beef and Broccoli
The latest in our video recipe series in cooperation with CBC Newfoundland and Labrador has been a very popular dish on Rock Recipes. Our easy, delicious Beef and Broccoli has many rave reviews and many people have said it's better that most restaurant versions they've tried. Our family prefers it over Chinese noodles rather than rice for a quick and easy weekday meal when you have little time to spare.

For the full recipe click here.

For Mobile users, if the video doesn't load below, please try this link


The Velvet Cake Collection; Red, Orange, Lemon and White

The Velvet Cake Collection; Red, Orange, Lemon and White
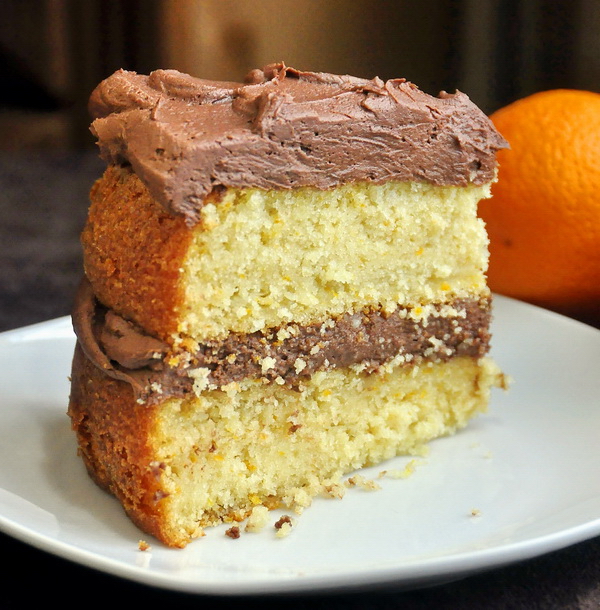
My attempt at developing a great Red Velvet Cake was such a success that I couldn't stop there. The texture was so light, moist and tender that I couldn't help but try other flavor variations. Since then, I've had additional success with lemon, orange and even white (vanilla) versions of this delicious cake. Pick your favorite version or try them all. They all make outstanding choices for birthday cakes too; one of these will almost certainly please any taste.

Am I done with variations of this recipe yet? Maybe not...I already have an idea for another one. Here's a hint, think pink...stay tuned.

Click the photo or title to be taken to individual recipes.


Red Velvet Cake


Orange Velvet Cake


Lemon Velvet Cake


Crab Cakes Eggs Benedict

Crab Cakes Eggs Benedict
In the very early days of Rock Recipes, actually in the first week, I featured one of my favorite Crab Cakes recipe which we sometimes serve in miniature form as delicious little finger food when friends come by in the evening for drinks. I decided to revisit the recipe this week in a terrific Eggs Benedict idea inspired by recent travels.

Our family vacation this year was another road trip, this time up eating our way up the eastern seaboard from Savannah to Boston. I tried some crab cake Eggs Benedict along the way in Maryland and knew I'd be making this dish when I got home with a bit of a Newfoundland twist.

Instead of an English muffin I've substituted our local favorite toutons and instead of the tarragon in the Hollandaise sauce, I used local Mt. Scio Savoury which I know may be an uncommon herb in may areas. Tarragon or dill will also make a delicious herb flavored Hollandaise if you can't find savoury. Any crab meat can be used. In Maryland I had blue crab cakes but I've used some delicious sweet Newfoundland snow crab in the version pictured.

My crab cakes use only enough other ingredients to hold the crab together and the mixture will be quite soft when you roll it into cakes and then into the cracker crumb mixture. They do take a gentle touch but once they are fried they hold together well. This very indulgent recipe sure would be perfect for a celebration brunch or breakfast treat at the end of a hard week.

Crab Cakes
Crab Cakes
You can always use English muffins or buttermilk biscuits as the base for this great dish. Find my recipe for Toutons at this link.


Crab Cakes Eggs Benedict

Recipe by Barry C. Parsons
Maryland meets Newfoundland in this indulgent version of Eggs Benedict, perfect for a celebration brunch.
Yield: 4 - 6 large crab cakes or about 18 hors d'ouevres
Ingredients
  • 1 pound coarsely chopped (NOT MINCED) fresh or frozen cooked crab meat
  • 3/4 cup + 1 cup cracker crumbs
  • 4 tbsp mayonnaise
  • 1 tsp lemon zest, minced
  • 2 tsp Worcestershire Sauce
  • 1/2 tsp salt
  • 1/2 tsp pepper
  • 2 tsp hot sauce (optional)
  • 2 eggs, lightly beaten
  • Aprox 2/3 cup canola oil for frying
  • FOR THE HOLLANDAISE SAUCE
  • 3 egg yolks
  • 1/2 tsp yellow mustard (or Dijon if you prefer)
  • 1-2 tbsp lemon juice
  • 1/2 tsp dry summer savoury (or dill or tarragon)
  • 1/2 cup hot melted butter
Cooking Directions
  1. Toss together the crab meat with the 3/4 cup cracker crumbs and all other ingredients except the canola oil.
  2. Form into cakes by hand to whatever size you prefer. (Small cakes make great hor’s d’ouevres).
  3. Roll in additional cracker crumbs.
  4. Heat about a half inch of canola oil in a skillet or sate pan over medium-low heat. You want these to fry gently, they will burn quickly if the oil is too hot.
  5. Fry until golden brown on both sides. Drain on paper towels.
  6. FOR THE HOLLANDAISE SAUCE
  7. In a blender combine the egg yolks, mustard and lemon juice for only a few seconds.
  8. With the blender on medium speed, slowly pour in the hot butter in a thin stream. The sauce should thicken quite quickly.
  9. Stir in the savoury. Pour into a bowl and keep the bowl warm in a warm water bath while preparing the other components of the Eggs Benedict.
  10. Place the cooked crab cakes on the warm toutons, top with a poached egg and finally the Hollandaise sauce.

Saturday, 28 September 2013

Lemon Velvet Cake

Lemon Velvet Cake
Lemon Velvet Cake
It all started with me trying to develop the best Red Velvet Cake recipe I could.  It was such a sucess and I loved the moist, tender texture of that cake so much that I just had to try a White Velvet Cake and then an Orange Velvet Cake. Those turned out to be a couple of the most popular cake recipes ever on Rock Recipes so I couldn't stop there. Keeping the lemon lovers like me in mind, a luscious lemon version was inevitable. The creamy, tangy lemon buttercream frosting goes particularly well with this beautiful lemon cake too.

Am I done with Velvet Cake recipes yet? Maybe not, I have an idea that might work out for yet another version. Here's a clue...think pink. :) 

Lemon Velvet Cake

Recipe by Barry C. Parsons
Developed from an outstanding Red Velvet Cake recipe, this lemon cake is a perfectly moist and tender crumbed cake with a lemony buttercream frosting. An ideal birthday cake for the lemon lover in your life.
Prep time: Approximately 20 minutes
Cook time: 35 minutes
Total time: Approximately 1 hour.
Yield: 12 -16 servings
Ingredients
  • 1 1/4 cups sifted all purpose flour
  • 1 1/2 cups sifted cake flour
  • 1/2 teaspoon baking soda
  • 1 1/2 tsp baking powder
  • 1 teaspoon salt
  • 1 1/2 cups sugar
  • 2/3 cup vegetable oil
  • 1/3 cup vegetable shortening at room temperature
  • 1 tsp good quality vanilla extract
  • 2 tsp pure lemon extract
  • 3 large eggs
  • 1 1/2 cups buttermilk
  • zest of two small or one large lemons, grated and finely chopped
  • FOR THE FROSTING
  • 8 cups icing sugar (powdered sugar)
  • 2 cups unsalted butter
  • 1 tsp pure lemon extract
  • 1 tsp minced lemon zest (optional) 
  • aprox 4 tbsp milk
Directions
  1. Grease and flour 2 nine inch round cake pans and line the bottom with 2 circles of parchment paper. Sift together both flours, baking soda. baking powder, salt and sugar, Set aside.
  2. In the bowl of an electric mixer beat together the vegetable oil, shortening, vanilla and lemon extract. Beat well at high speed with whisk attachment until light and fluffy
  3. Beat the eggs in one at a time.
  4. Fold in the lemon zest.
  5. Fold in the dry ingredients alternately with the buttermilk.
  6. I always add dry ingredients in three divisions and liquid ingredients in 2 divisions. It is very important to begin and end the additions with the dry ingredients. Do not over mix the batter. As soon as it has no lumps in the batter, pour into the two prepared 9 inch cake pans.
  7. Bake at 325 degrees F for 30-35 minutes or until a wooden toothpick inserted in the center comes out clean. Allow the cake to cool in the pans for 10 minutes before turning out onto wire racks to cool completely.
  8. FOR THE FROSTING: mix together the icing sugar, lemon zest and butter until it becomes sort of crumbly.
  9. Add the lemon extract and a little of the milk.
  10. Beat until smooth and fluffy, adding only enough milk to bring the frosting to a creamy spreadable consistency.
  11. Fill and frost the cake. Garnish with candied lemon zest if desired.
  12. To make candied lemon zest, remove the zest with a sharp vegetable peeler in long strips, avoiding as much of the white pith as possible.
  13. Bring one cup of water and one cup of sugar to a slow boil.
  14. Add the pieces of lemon zest and boil for about 15 minutes. Drain the lemon zest on a wire rack.
  15. When cool, cut them in strips and roll in fine sugar. 
For the other recipes in our Velvet Cakes Collection click the photo below.
The Velvet Cake Collection
Lemon Velvet Cake
Lemon Velvet Cake

    Friday, 27 September 2013

    Oven Baked Southern Fried Chicken Wings with Orange Honey Drizzle

    Oven Baked Southern Fried Chicken Wings with Orange Honey Drizzle
    Oven Baked Southern Fried Chicken Wings with Orange Honey Drizzle

    The inspiration for these tantalizing wings comes from a habit of drizzling honey on take out fried chicken. When it comes to fried chicken the Colonel is not king here in Newfoundland, we are reigned by Queen Mary. Mary Brown's fried chicken is a franchise that started here and is now expanding across the country. The seasoning on their product is much lighter than many other fried chicken chains and even as a kid I enjoyed it a drizzle of golden honey to compliment the crunchy, succulent pieces.

    As the number of recipes for them on this website will attest, I do love some great wings and when trying to come up with a way to pay homage to orange chicken in wing form, I thought of my love for honey on fried chicken. Why not infuse the honey with the orange and impart the flavor that way? Some friends were dropping by for sips and nibbles so I got my chance to try it out.

    The result was fantastic! All the flavors worked together so well and once again only empty platters remained. I recommend drizzling the platter as you serve it to your guests and leaving a little jug or gravy boat of the citrus infused honey on the side for those who'd like more. You'll have them salivating before they take the first bite.

    These wings as pictured, were oven baked but if you prefer to deep fry them that's perfectly fine. I'd give them about 20 minutes at 350 degrees F, depending on the size of the wings you're using.


    Oven Baked Southern Fried Chicken Wings with Orange Honey Drizzle

    Recipe by Barry C. Parsons
    Crispy, oven baked Southern fried wings drizzled with orange infused honey.
    Prep time: Aproximately 20 minutes
    Cook time: 40 minutes
    Total time: 1 hour
    Yield: 3 - 4 pounds wings
    Ingredients
    • 3 cups flour
    • 1 tbsp salt (plus more to season wings)
    • 1 tbsp freshly ground black pepper
    • 2 tbsp onion powder
    • 1 tbsp garlic powder
    • 1 tbsp dried thyme
    • 1 tbsp ground sage
    • 1 tbsp dried oregano
    • 1 tbsp dry mustard powder
    • 1 tbsp powdered ginger
    • 1 tbsp paprika
    • 1 tbsp cayenne pepper
    • 3 - 4 lbs chicken wings
    • 3 eggs
    • 3 tbsp water
    • 3 tbsp canola oil
    • 1 cup honey
    • zest of 1/2 large orange, finely grated
    Cooking Directions
    1. Preheat oven to 375 degrees F.
    2. Mix the flour with the salt, pepper and all of the herbs and spices
    3. Coat the bottom of a cookie sheet or large baking pan with the canola oil.
    4. Whisk together the eggs and water to make an egg wash.
    5. Season the wings with salt.
    6. One at a time, dip the chicken wings in the flour and herb/spice mix, then quickly into the egg wash and back into the flour dredge again.
    7. Place the coated chicken wings in the pan and lightly spray the tops with canola oil from a spray bottle.
    8. Bake for about 40 minutes or until fully cooked, golden brown and crispy, turning at least once during the cooking time.
    9. Add the honey and orange zest to a small saucepan.
    10. Bring to a gentle simmer for only a minute then remove from the heat.
    11. Drizzle the wings with the orange honey when serving. 
    Oven Baked Southern Fried Chicken Wings with Orange Honey Drizzle
    Oven Baked Southern Fried Chicken Wings with Orange Honey Drizzle

      Thursday, 26 September 2013

      Cheesy Tomato Basil Baked Tortellini with Parmesan Pepper Crumb Topping

      Cheesy Tomato Basil Baked Tortellini with Parmesan Pepper Crumb Topping
      Cheesy Tomato Basil Baked Tortellini with Parmesan Pepper Crumb Topping
      This delicious pasta dish was once again the result of a fridge clean out the other day. The fridge yielded some leftover simple tomato basil sauce from a pizza dinner a couple of nights earlier, half of a large package of cheese stuffed tortellini that the kids had opened when making their own lunch on the weekend and some mozzarella, asiago and Parmesan cheeses. The end of a loaf of crusty Italian bread was also on the counter top for possible use as well as a bunch of basil that needed to be used within a day or so. Some leftover grilled chicken breast was also available to add to the mix but this would be a perfectly good meal even without the chicken.

      In about 20 minutes I had all of these components thrown together into a casserole dish in about 20 minutes and in the oven for about 35 minutes, so in under an hour we had this delicious pasta dinner on the table.

      It was so good that all of us had small second portions and although it was kind of an "everything but the kitchen sink sort of meal, it turned out so fantastically  that it's sure to make regular repeat appearances on our dinner table.


      Cheesy Tomato Basil Baked Tortellini with Parmesan Pepper Crumb Topping

      Recipe by Barry C. Parsons
      Cheesy Tomato Basil Baked Tortellini with Parmesan Pepper Crumb ToppingA simple but delicious baked pasta dinner that's sure to make it's way into your regular dinner rotation.
      Prep time: 20-25 minutes
      Cook time: 35 minutes
      Total time: 1 hour
      Yield: 6 servings
      Ingredients
      • 4 cups crushed canned tomatoes
      • 2 tbsp olive oil
      • 4 cloves garlic, minced
      • 1/2 tsp salt
      • 1/2 tsp black pepper
      • pinch brown sugar
      • 2 tbsp balsamic vinegar
      • 1/2 cup chopped fresh basil
      • 1/2 cup finely grated asiago cheese (or Parmesan)
      • 2 cups grated mozzarella cheese
      • 1 cup bread or cracker crumbs
      • 2 tbsp olive oil or melted butter
      • 2 tsp freshly ground black pepper
      • 1/2 cup freshly grated Parmesan cheese
      • 1 lb package cheese tortellini
      • 3-4 cooked chicken breasts, diced
      Cooking Directions
      1. In a medium saucepan over medium flame, heat the 2 tbsp olive oil and add the minced garlic. Saute for a minute.
      2. Add the crushed tomatoes, salt, pepper, brown sugar and balsamic vinegar.
      3. Simmer for about 20 minutes or until the sauce reduces and begins to thicken.
      4. Remove from heat and stir in the fresh basil and asiago cheese.
      5. Cook the tortellini in salted water and boil for 10 minutes or according to the package directions.Drain.
      6. Stir the drained tortellini and diced chicken into the sauce.
      7. Sprinkle on the grated mozzarella.
      8. Pour the pasta and sauce into a greased casserole dish.
      9. Toss together the bread or cracker crumbs, olive oil (or melted butter), grated Parmesan and 2 tsp black pepper. Sprinkle evenly over the top of the mozzarella.
      10. Bake in a pretested 375 degree F oven for about 35 minutes or until the crumbs are golden brown and the sauce is bubbling.

      Wednesday, 25 September 2013

      Guest Post: Pumpkin Chai Smoothie {gluten-free + vegan} by Tasty Yummies


      I am super excited to have Beth from Tasty Yummies guest posting for The Seasonal REAL Food Blog Series.  I am a huge fan of Beth's blog and have been following it for a long time now.  Her photos are simply beautiful and her gluten-free, fresh, unprocessed recipes won't disappoint (many are vegan too).  

      Please make sure to visit Tasty Yummies and check out Beth's wonderful blog.  And while you're there, make sure to check out some of my favorite recipes: Grain-Free Mini Pumpkin Pie Tarts (Vegan), No Bake Vegan "Cheesecake", Cocoa Dusted Macadamia Nuts,  and Grilled Sweet Potato & Wilted Kale Salad.     


      ************


      Hi there, I am Beth from Tasty Yummies. I am a yoga-obsessed graphic designer, illustrator and printmaker living in Southern California and I have been blogging and sharing my recipes on Tasty Yummies for nearly four years. All of the recipes I share on my website are gluten-free, clean and seasonal, many are dairy-free and vegan. I consider myself to be a “conscientious omnivore”, though I eat a lot of naturally vegan foods. 

      I am so excited to be here sharing a fun fall recipe here on Recipes to Nourish. I had to go with a pumpkin recipe, because it is one of my most favorite things about this time of year. 

      This pumpkin chai smoothie is simple to make and it's the perfect way to enjoy one of fall's best flavors any time you'd like. Besides being so delicious, pumpkin is loaded with a variety of health benefits, too. Chock full of vitamins, minerals, fiber and antioxidants here are just some of the benefits of that orange goodness!

      - Great for digestion! Just 1 cup of pumpkin provides you with 7.1 grams of dietary fiber. Plus 10% of your daily requirement for potassium. 

      - Promotes a strong and healthy immune system with various vitamins, minerals and antioxidants. 1 cup of pumpkin supplies 3.4 grams of iron, plus more than your daily serving of vitamin A from antioxidant carotenoids, particularly alpha and beta-carotenes. It’s a good source of vitamins C, K, and E, and lots of minerals, including magnesium.

      - Low in calories and fat. One cup contains less than 50 calories, less than one gram of fat and around 3 grams of protein. Plus only 8 grams of carbohydrates.

      And don't forget to scoop out and save the seeds and toast 'em up. Pumpkin seeds are a good source of protein and fiber, iron, magnesium, phosphorus, potassium, zinc, copper, and manganese and a number of other health benefits themselves

      What's your favorite way to eat pumpkin?


      Pumpkin Chai Smoothie - Gluten-free & Vegan

      {Affiliate links included help support this blog.} 
      • 1/2 cup organic pumpkin puree (fresh or canned)
      • 1 frozen organic banana
      • 1 cup unsweetened almond milk or milk of your choice
      • 1 tablespoon maple syrup or honey (or other sweetener of your choice, you can also add a one or two medjool dates)
      • 1 teaspoon vanilla extract
      • 1/4 teaspoon cinnamon* 
      • 1/8 teaspoon nutmeg*
      • 1/8 teaspoon ginger*
      • dash each of black pepper, ground cloves and ground cardamom*

      Add all of the ingredients to your blender and blend until smooth and creamy. Serve immediately.

      {serves 1} 

      {*Recipes to Nourish Note: I purchase all of my spices here.}


      If you haven't already, make sure to connect with Beth from Tasty Yummies on Facebook, Instagram, Twitter and Pinterest.  


      Amazon and Mountain Rose Herbs links are affiliate links, prices are the same for you.  Should you decide to purchase through my blog, thank you in advance and much gratitude for supporting Recipes to Nourish.

      Tiohor Khar ( Cucumber Khar)

      The khar is a signature class of preparations made with a key ingredient, also called khar. The traditional ingredient is made by filtering water through the ashes of a banana tree, which is then called kola khar (The name derived from the locale term of Banana, "Kol" or "Kola"). A traditional meal invariably begins with a khar dish, made of raw papaya, pulses or any other main ingredient  (Courtesy- Wikipedia)

      Here i have shared Tiohor Khar ( Cucumber Khar) which is very simple to prepare and very tasty to eat....


      Ingredients:

      • Fried Fish head: 500 gms
      • Cucumber (Tioh): 2-3 medium size
      • Mustard oil: 2 tbsps
      • Crushed garlic cloves: 1/2 tbsp
      • Slit green chilies: 2
      • Salt: to taste
      • Kolakhar: 1 tbsp or sodium bicarbonate: 1/4 tsp


      Method:

      • wash and cut cucumber
      • Heat oil and fry the garlic till brown.
      • Add the fried fish head pieces and stir for a minute.
      • Add chopped cucumber and stir for about half a minute.
      • Add slit green chilies, salt,and kolakhar or sodium bicarbonate.
      • Add water and stir and close cover.
      • Cook for another 15 minutes and switch off the gas.
      • The Cucumber  khar is ready to be served with rice.

      Labra....An Assamese style mix vegetable dish...

      This recipe contains several kinds of vegetables ( Pumpkin, Radish, Potato, Brinjal, Raw banana, peas, Cabbage, Cauliflower and so on ) cooked on low flame along with light spices...For Assamese people this particular dish is an important part of community feasts , especially during Swaraswati puja, Durga Puja and Viswakarma Puja....... Labra goes well with rice and Khichidi.....


      Ingredients:

      • Cabbage- chopped 2 cup
      • Cauliflower- 1 cup
      • Potato 1- cut in cubes
      • Radish 1 -cut in medium pieces
      • Red pumpkin  1 an 1/2 cup
      • Brinjal- 1
      • Peas- 1/2 cup
      • Raw Banana- 1/2 cup
      • Onion-1 chopped
      • Cooking oil- 2tsp
      • Turmeric powder- 1tsp
      • Ginger garlic paste- 1tsp
      • Green chilly- 1-2
      • Red chilly- 1-2
      • Salt as per taste
      • Sugar a pinch
      • Coriander leaves (optional)

      Method:

      • Heat oil and  add a pinch of sugar, onion,chillies, turmeric, cumin powder and ginger-garlic  paste and mix well. 
      • When all ingredients  change colour, add all the vegetables and stir.
      • Now add salt and cover cook over low heat till all the vegetables are cooked. 
      • Increase the heat so that all the moisture is dried up. 
      • Garnish with coriander leaves and Serve hot


      Monday, 23 September 2013

      Guest Post: Roasted Sweet Potato, Kale + Sage Skillet Quinoa by With Food + Love


      Next up for The Seasonal REAL Food Blog Series ... Sherrie from With Food + Love!  I'm a huge fan of Sherrie's blog, she puts so much love into what she does, her recipes are delicious and she takes the most stunning photos.  Plus, she's such a sweetheart, so positive, believes in holistic health and wellness and she's also a Board Certified Holistic Health Coach.  

      Please make sure to visit With Food + Love and check out Sherrie's awesome blog.  And while you're there, check out some of my favorite recipes: Golden Beet Soup w/ Roasted Garlic Cashew Cream and Skillet Roasted Cauliflower + Fennel w/ Caramelized Shallots. 


      ************


      Hello everyone - I'm Sherrie the girl behind With Food + Love and I am so stoked to be guest posting today on Recipes to Nourish. Emily - your beautiful blog, soul-warming recipes and bright spirit always keeps me coming back for more. I am so honored to be here; thanks so much for inviting me into your cherished space.  

      Fall is here my friends. Yay - everyone's favorite time of year! The crisp air, robust flavors, snuggling up with a cup of tea, wearing boots, scarves and warm layers - I mean what's not to love?

      Nothing spells out autumn quite like a roasted sweet potato combined with dark leafy greens and a hearty whole grain {well in this case, quinoa is technically a seed}. These three ingredients were created for each other. Add in a hint of sage and you have the perfect bowl of belly-warming goodness. This dish is quick + simple and it will leave your family feeling full + satisfied. Enjoy! 


      ROASTED SWEET POTATO, KALE + SAGE SKILLET QUINOA 

      Ingredients:
      • 2 cups of cooked quinoa
      • 1 extra large shallot, chopped {about 1/2 cup}
      • 1 tablespoon fresh sage, chopped
      • 2 sweet potatoes
      • 4 cups Tuscan kale, ribs removed + shredded 
      • 2 tablespoons coconut oil
      • 1/2 teaspoon paprika
      • sea salt + coarse ground pepper, to taste

        1. Preheat the oven to 400. Scrub and dry your sweet potatoes and pierce a few times each with a knife. Do NOT cover in foil. Place a cookie sheet {to catch the drips} on the bottom shelf in the oven and toss the potatoes onto the shelf above it. Roast as is for about 45 minutes, or until soft and tender. Cool almost completely, peel the skins off and chop into small bites. 

        2. In a medium-large frying pan or cast iron skillet heat the coconut oil over low heat. Saute the shallots for about 5 minutes or until they start to turn translucent. Then add in the sage, paprika, sea salt and pepper, cook for a few minutes more. Next add in the shredded kale and the remaining tablespoon of coconut oil, combine well. Cook the kale until it wilts slightly and turns bright green, about 3-5 minutes. 


        3. Toss the chopped sweet potatoes and quinoa in the skillet and mix together. Heat through and serve warm. 


        {serves 4}


        Sherrie Scaglione Castellano is a Board Certified Holistic Health Coach {AADP} specializing in plant-based, clean eating. Sherrie is the founder and author of, With Food Love. Connect with her on FacebookTwitterPinterest and Instagram pages. You can find Sherrie in Philadelphia, PA where together her and husband are enjoying life's simplest pleasures like, snuggling up with a big cup of earl grey tea or catching a flick at their local independent theater.